


If you’re planning a retaining wall project, Home Depot retaining wall blocks are one of the most accessible starting points. Home Depot carries a wide range of block styles, sizes, and price points, enough options to handle everything from a small garden border to a multi-tiered hillside wall.
At CHC Concrete, we build retaining walls across Fort Myers, Cape Coral, Estero, and Bonita Springs. We know what holds up in Southwest Florida’s sandy soil and heavy rain seasons, and we know what doesn’t. That hands-on experience gives us a practical perspective on the blocks you’ll find at Home Depot, which ones work well for DIY projects, which ones belong in professional installations, and where the real cost differences show up.
This guide breaks down the types of retaining wall blocks Home Depot sells, what you can expect to pay, and how to install them step by step. We’ll also cover when a project makes sense to tackle yourself and when it’s worth calling in a licensed concrete contractor to get the job done right.
What to know before buying wall blocks at Home Depot
Walking into Home Depot with a retaining wall project in mind can feel straightforward until you reach the outdoor building materials aisle. You’ll find multiple block systems from brands like Allan Block, Versa-Lok, and Oldcastle, each with different sizes, weights, shapes, and interlocking mechanisms. Before you load up a cart, you need to understand how wall purpose, block type, and local code requirements interact, because choosing the wrong block early on leads to expensive fixes later.
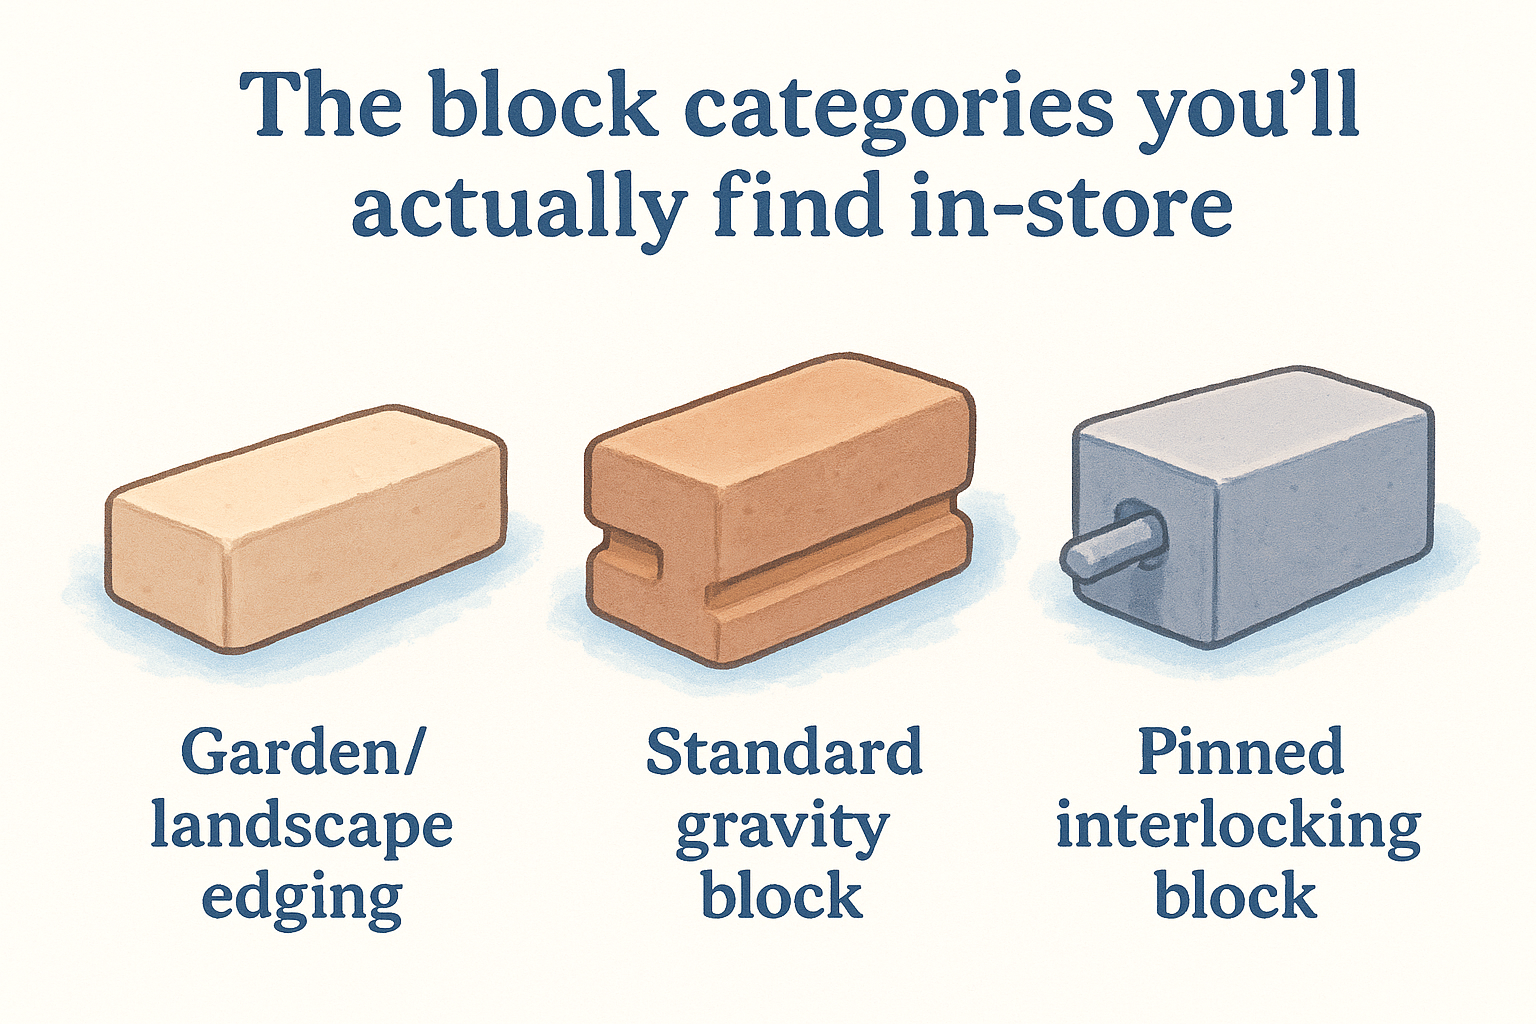
The block categories you’ll actually find in-store
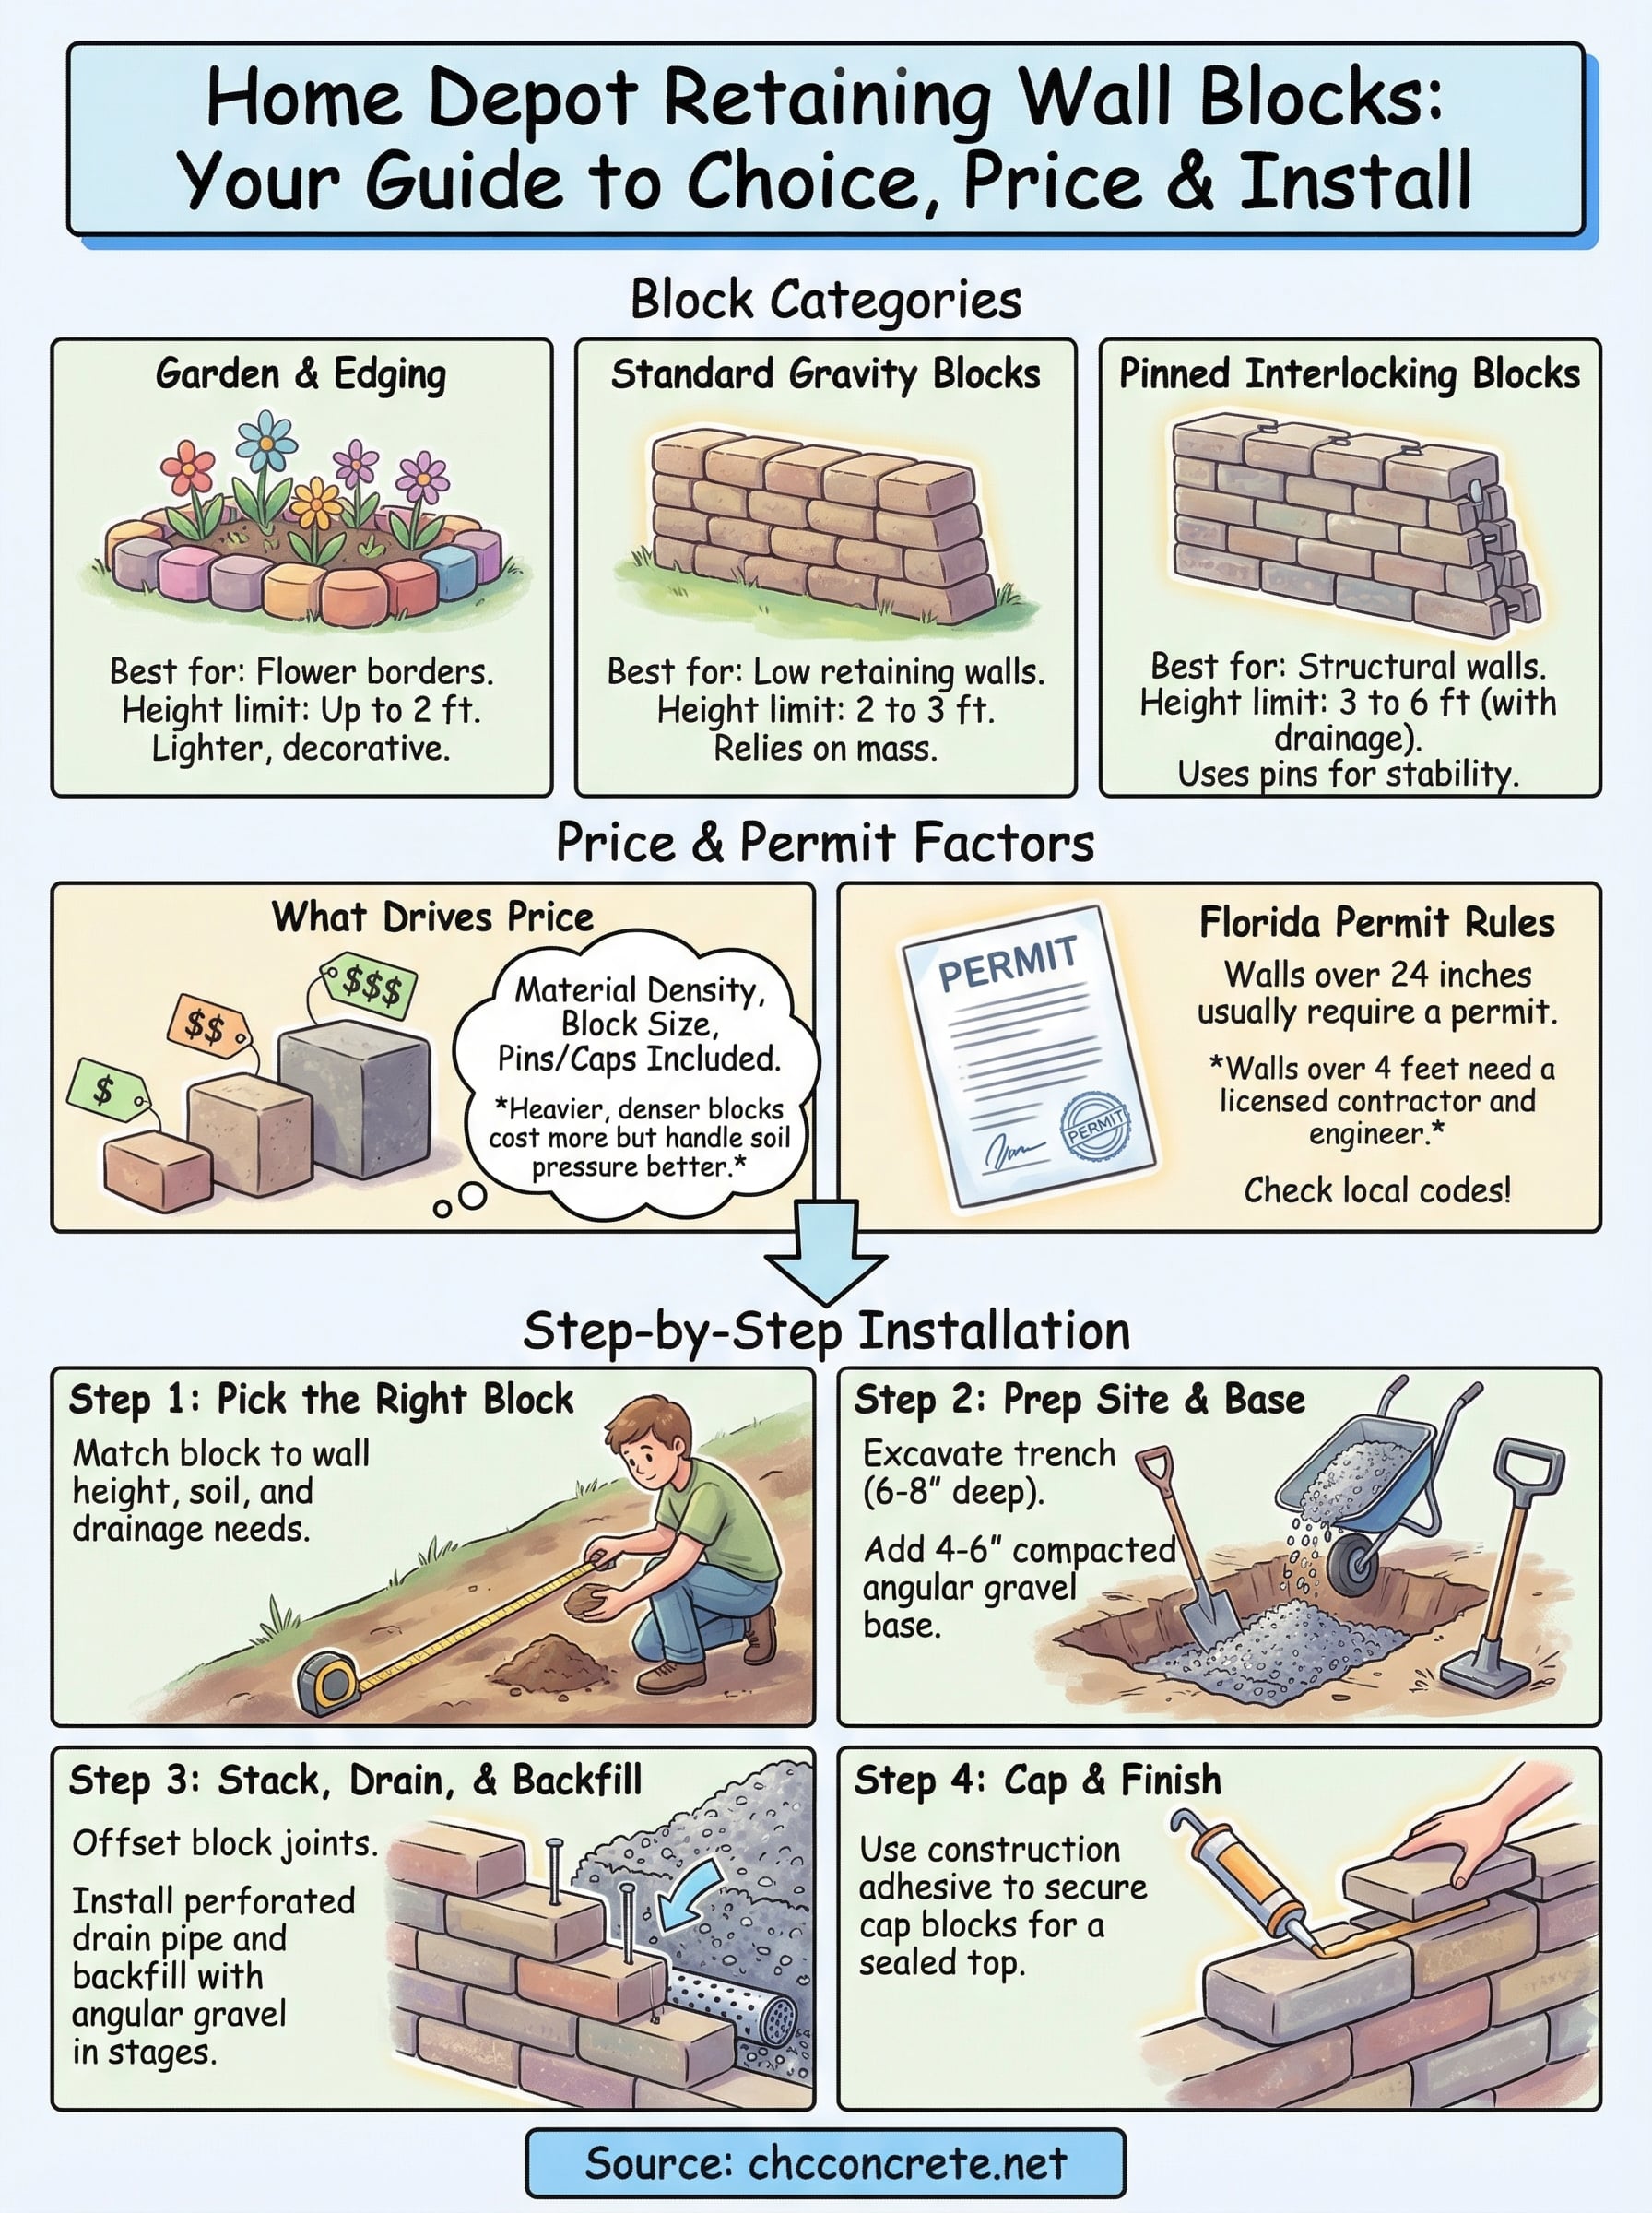
Home Depot retaining wall blocks generally fall into three categories: standard gravity blocks, pinned interlocking blocks, and garden or landscape edging blocks. Standard gravity blocks rely on mass and a slight backward setback to hold soil in place. Pinned interlocking blocks use a fiberglass or steel pin system to connect courses and create a more stable structure for taller walls. Garden wall blocks are lighter, smaller, and designed for decorative borders rather than load-bearing applications.
| Block Category | Typical Use | Practical Height Limit |
|---|---|---|
| Garden / landscape edging | Flower beds, decorative borders | Up to 2 ft |
| Standard gravity block | Low retaining walls | 2 to 3 ft |
| Pinned interlocking block | Structural retaining walls | 3 to 6 ft (with drainage) |
Knowing which category fits your project before you shop prevents the common mistake of buying garden wall blocks for a structural application. Those lighter blocks simply cannot handle the lateral soil pressure that builds up behind a real retaining wall, especially after a heavy rain.
What drives the price difference
Block prices at Home Depot range from roughly $2 per block for basic landscape edging pieces to $10 or more for large structural blocks. The price gap comes down to material density, block size, and whether the system includes pins or caps. A heavier, denser block handles soil pressure better, but it also adds labor time and requires more careful base preparation. In Southwest Florida’s loose, sandy soil, buying the smallest or cheapest structural block to save money often results in wall lean or complete shift within a few seasons.
Buying the cheapest block available might cut your upfront cost, but it routinely doubles the repair bill when the wall fails under hydrostatic pressure from a wet season.
Height limits and permit rules in Florida
This is where many DIYers get tripped up. Florida building code requires a permit for retaining walls over 24 inches in height when measured from the bottom of the footing. If your yard has significant grade change, which is common in Cape Coral or Estero where lots were built up with fill, you may need an engineered design even for a wall that looks modest from the street. Walls over 4 feet almost always require a licensed contractor and an engineer’s stamp in Lee County.
Call your local building department before purchasing any materials. Pulling a permit after construction costs more and can require you to tear down and rebuild the wall to meet code. Confirming the requirements first takes about 15 minutes and protects both your investment and your property value.
Step 1. Pick the right block type for your yard
Choosing the right block starts with three factors: wall height, soil conditions, and the drainage situation behind the wall. When you browse home depot retaining wall blocks in-store or online, you’ll see products marketed broadly across multiple applications. Narrowing your selection before you drive to the store prevents you from loading up a flatbed cart with blocks that look right but fail within two or three seasons.
Match block size to wall height
Your wall’s final height determines the minimum block density and system type you need. Walls under 24 inches can use standard landscape blocks, but anything taller demands a pinned interlocking system with a proper batter, meaning the slight backward lean built into the wall as you stack each course to counteract soil pressure. The table below gives you a practical starting point:
| Wall Height | Recommended Block Type | Example Product |
|---|---|---|
| Under 2 ft | Landscape or edging block | Oldcastle Country Manor |
| 2 to 4 ft | Pinned interlocking block | Allan Block Classic |
| 4 to 6 ft | Large structural pinned block | Versa-Lok Standard |
For walls taller than 3 feet in Southwest Florida’s sandy fill soil, always choose a pinned interlocking system over a standard gravity block, regardless of what the product packaging suggests.
Factor in your soil type and drainage needs
Sandy soil, which covers most residential lots in Fort Myers and Cape Coral, drains fast but shifts under lateral pressure, especially after a heavy rain. This means you need a block with a larger footprint and a solid drainage plan behind the wall, not just a block that fits your budget for the day. Heavier structural blocks cost more per unit but resist the push that saturated sand creates once a summer storm rolls through.
Drainage and block selection go hand in hand, so if your yard collects standing water or sits near a drainage swale, account for that before you finalize your block choice. A pinned interlocking block combined with a gravel backfill and perforated drain pipe handles hydrostatic pressure far better than a lightweight landscape block with compacted fill directly behind it.
Step 2. Estimate materials and total cost
Getting your material estimate right before you drive to Home Depot saves you from multiple trips and protects you from running short mid-project. A solid estimate covers block quantity, base gravel, drainage material, pins, and cap blocks. Each of those line items adds to the total, so calculating them upfront gives you a realistic budget before a single block is moved.
Calculate how many blocks you need
Start with the total square footage of your wall face, meaning length multiplied by height. Most standard retaining wall blocks cover between 0.5 and 1 square foot of face area per block depending on the product. Divide your total wall face square footage by the coverage per block listed on the product page, then add 10 percent for cuts and waste. That buffer accounts for corners, end pieces, and any blocks that crack during installation.
Use this simple template to run your calculation before visiting the store:
Wall length (ft) x Wall height (ft) = Total face sq ft
Total face sq ft / Coverage per block (sq ft) = Base block count
Base block count x 1.10 = Final order quantity (includes 10% waste)
For example, a 20-foot wall that stands 3 feet tall gives you 60 square feet of wall face. If your chosen block covers 0.67 sq ft each, you need approximately 90 blocks before adding waste, so order around 100.
Always confirm the coverage rate on the specific product page for home depot retaining wall blocks, because it varies between systems and block sizes.
Account for gravel, pins, and caps
Crushed gravel for the base and drainage backfill typically adds $50 to $150 to a small-to-medium wall project. Plan for a 6-inch compacted gravel base beneath the first course, plus a gravel backfill column of at least 12 inches behind the wall. Most pinned block systems require one pin per block per course, so calculate your pin count based on your total block quantity minus the bottom and cap courses.
Cap blocks run roughly $2 to $5 per linear foot depending on the style. Add that line item to your budget separately since caps are priced differently than field blocks and are easy to forget until you reach the final course.
Step 3. Prep the site and build a level base
Site preparation decides whether your wall lasts five years or twenty-five. Skipping or rushing this step is the most common reason DIY retaining walls lean, crack, or tip forward after the first wet season. A properly excavated and compacted base distributes the weight of every block above it, so the time you invest here directly protects every hour you spend stacking courses later.
Mark the layout and excavate the trench
Start by marking your wall’s footprint with spray paint or stakes and string. This gives you a clear line to follow when you dig and prevents the wall from wandering off course. Excavate a trench that runs the full length of your planned wall, at least 12 inches wide and 6 to 8 inches deep to accommodate your gravel base. In Southwest Florida’s sandy soil, the sides of your trench may shift as you dig, so work quickly and check your string line regularly to stay on track.
Bury your first course of home depot retaining wall blocks so the top of that course sits at or slightly above grade. This approach gives the wall a proper anchor below the surface instead of sitting on top of loose soil where lateral pressure will push it forward over time.
Burying the base course is not optional in sandy fill soil. It anchors the entire wall and prevents the bottom from kicking out under load.
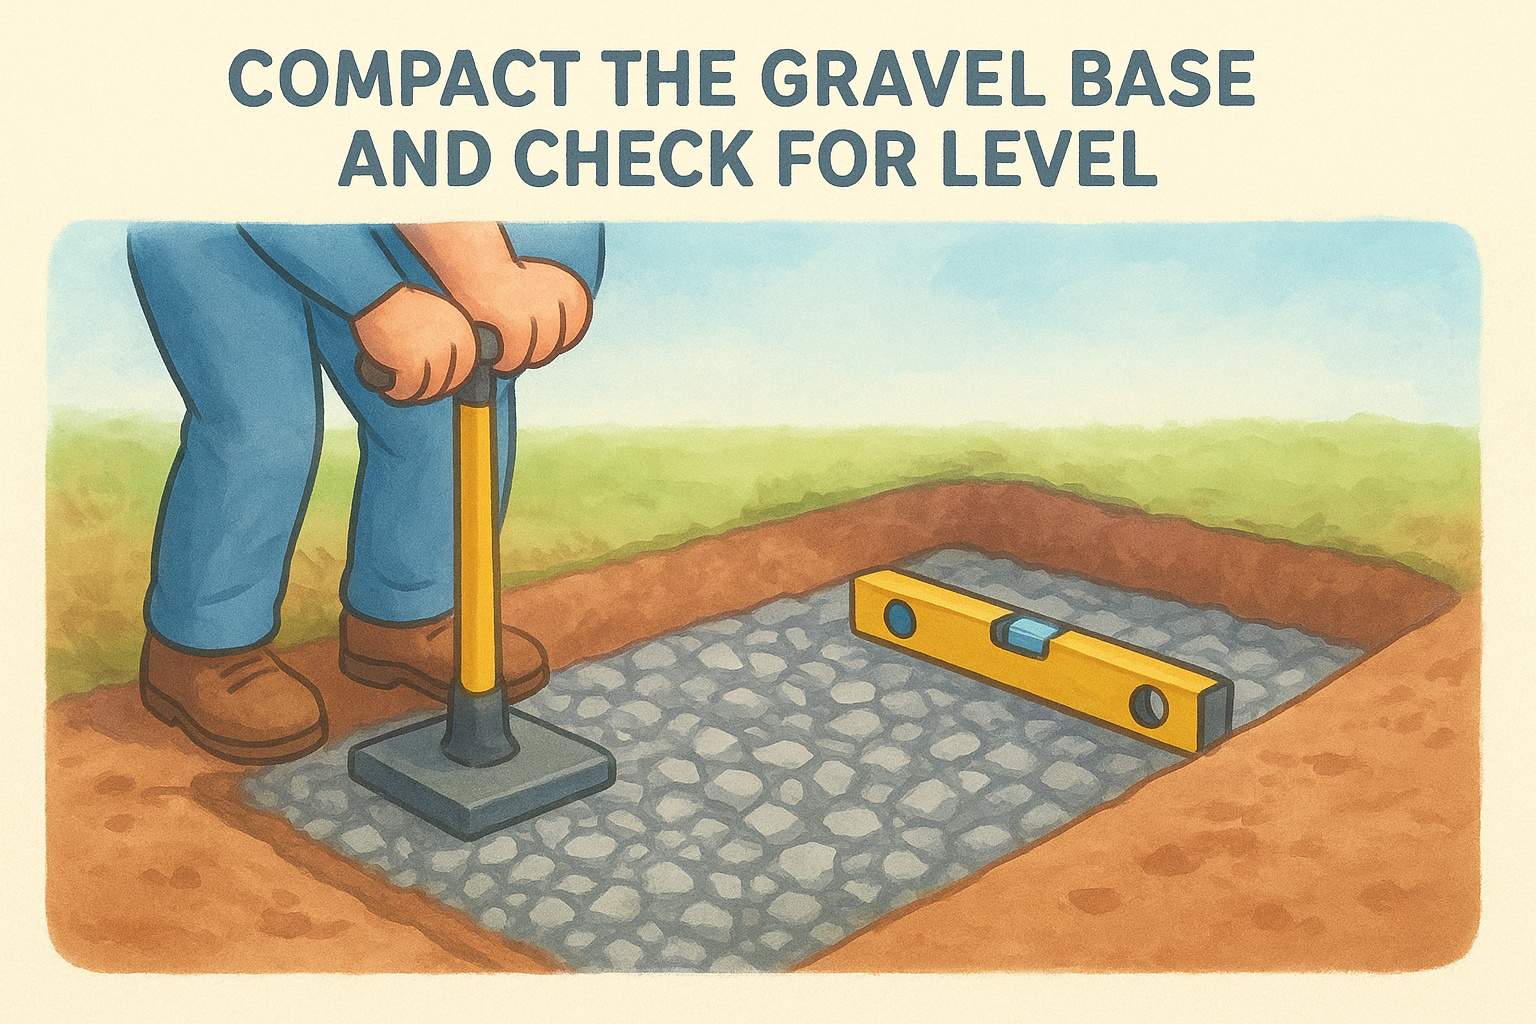
Compact the gravel base and check for level
Pour 4 to 6 inches of crushed angular gravel into the trench, not pea gravel or sand, because angular gravel compacts tightly and resists shifting under pressure. Spread it evenly, then compact it with a hand tamper or plate compactor. Angular gravel locks together when compacted in a way that rounded material never will.
Use this checklist before laying your first block:
- Trench depth: 6 to 8 inches below finished grade
- Gravel layer: 4 to 6 inches of compacted angular crushed stone
- Surface level: checked every 4 feet with a 4-foot level
- Trench width: at least 12 inches, or wider than your block footprint
- Loose material: removed from the bottom before gravel goes in
Check level in both directions, front to back and side to side, before placing any block. A base that is off by even half an inch compounds with every course you stack on top of it.
Step 4. Stack courses, add drainage, and backfill
With your base course set and level, you can start stacking. Each course of home depot retaining wall blocks needs to step back slightly from the one below it, creating the backward lean called batter. Most interlocking block systems build that batter in automatically through a lip or offset on the back of each block, so follow the manufacturer’s instructions for your specific product before you set a single piece.
Stack each course with offset joints
Place the second course so the vertical joints between blocks are offset by at least half a block length from the course below, similar to how a brick wall is laid. This running bond pattern locks the courses together and prevents a continuous vertical crack from forming top to bottom. Set your pins through each block as you go if your system requires them, tapping them firmly into place with a rubber mallet.
Check level across each course every 4 to 6 feet before moving up to the next. A small correction on course two or three takes a minute; the same problem discovered on course five means pulling back multiple rows and resetting blocks you already placed.
Install drainage pipe and backfill in stages
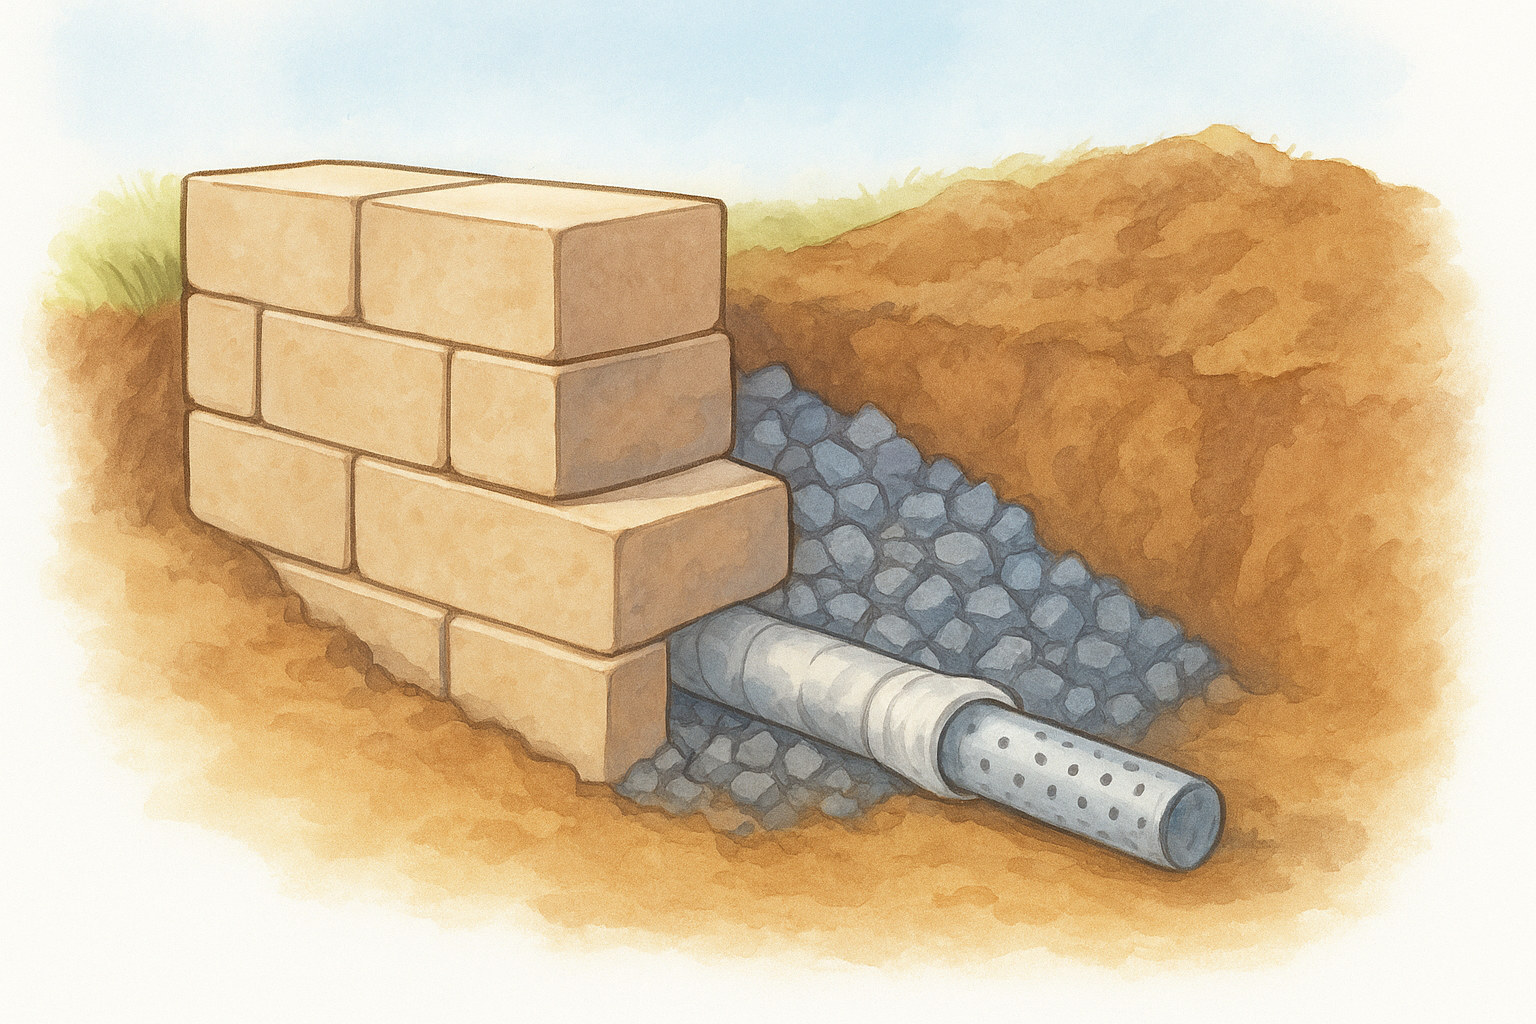
Do not wait until the wall is fully stacked to handle drainage. Lay a perforated drain pipe at the base of the wall directly behind the first course, sloped toward daylight at both ends so water has somewhere to exit. Wrap the pipe in filter fabric to keep sand out of the perforations, which matters especially in Southwest Florida’s sandy fill soil where fine particles migrate into drain lines quickly.
Installing drainage as you build, rather than after the wall is complete, is the single most effective way to prevent hydrostatic pressure from pushing your wall out of alignment over time.
Backfill with angular crushed gravel for the first 12 inches directly behind the wall, then compact native soil in 6-inch lifts beyond that gravel zone. Add backfill in stages as each course goes up rather than dumping it all at once. Filling too fast puts immediate lateral pressure on courses that the blocks above have not yet locked into position.
Step 5. Cap, finish, and prevent common failures
The final course of your wall is the cap, and it does more than add a finished look. Cap blocks seal the top of the wall and prevent water from channeling directly down behind the block faces, which reduces erosion behind the wall over time. Most home depot retaining wall blocks systems sell matching cap pieces that use construction adhesive instead of pins to lock them in place permanently.
Set the cap course correctly
Apply a continuous bead of landscape construction adhesive along the top surface of your last full course, then press each cap block firmly into position. Stagger the cap joints so they do not align with the joints in the course below. Let the adhesive cure for at least 24 hours before allowing foot traffic or any pressure on the top of the wall.
Skipping the adhesive on the cap course is one of the most common finishing mistakes, and cap blocks that shift or pop off expose the top of the wall to water intrusion that accelerates deterioration.
Spot the warning signs before they become failures
Once your wall is complete, inspect it after the first major rainstorm to catch problems early. Water should flow out from the ends of your drainage pipe, not pool behind the wall or saturate the backfill zone. If you see water seeping through the block joints rather than draining cleanly at the base, your drainage pipe may be blocked or improperly sloped.
Check for these warning signs during your post-rain inspection:
- Bulging in the middle courses, which signals excess lateral pressure
- Leaning at the top, which indicates base settlement or inadequate batter
- Efflorescence (white mineral deposits) on the block face, which signals moisture is moving through the blocks rather than around them
- Cracking at the corners, which suggests differential settling in the base layer
- Standing water directly behind the wall 24 hours after rain
Catching any of these issues within the first season gives you the best chance of making a targeted repair instead of rebuilding the entire wall. Small corrections made early, like clearing a blocked drain pipe or tamping a soft spot in the base, prevent the kind of structural shift that turns a simple fix into a full demo-and-rebuild.
Next steps for a long-lasting retaining wall
Following the steps in this guide puts you in a strong position to build a wall that holds up through Southwest Florida’s wet seasons and shifting sandy soil. Home depot retaining wall blocks give you a solid starting point when you match the block type to your wall height, install proper drainage from the beginning, and take the time to set a compacted, level base. Skipping any one of those steps is where most DIY walls eventually fail.
Your project’s complexity determines whether DIY is realistic or whether bringing in a professional protects your investment better. Walls over 3 feet, lots with significant grade change, and sites near drainage swales all carry real risk if the design or installation is off. If your project falls into any of those categories, talk to a licensed retaining wall contractor before you buy a single block. Getting the assessment right from the start costs far less than rebuilding a failed wall.