


A retaining wall that’s starting to lean isn’t just an eyesore, it’s a structural problem that gets worse with time. If you’ve noticed your wall tilting, bulging, or pulling away from the soil it’s supposed to hold back, you’re right to look into how to fix a leaning retaining wall before it fails completely. In Southwest Florida, where sandy soils shift and heavy rain saturates the ground for months, retaining walls take a beating that most other regions don’t deal with.
The fix depends on what’s causing the lean. Sometimes it’s poor drainage behind the wall. Sometimes it’s an inadequate footing or a wall that was never designed to handle the load it’s holding. The good news is that many leaning walls can be repaired, but the method matters, and so does knowing when the wall is beyond saving and needs a full rebuild.
At CHC Concrete, we’ve repaired and replaced retaining walls across Fort Myers, Cape Coral, Estero, and Bonita Springs, so we know exactly what causes them to fail in this part of Florida. This guide walks you through the common causes of retaining wall lean, the repair options available, and how to decide whether this is a DIY fix or a job for a professional crew.
What makes a retaining wall lean
A retaining wall leans because the forces pushing against it have grown stronger than the forces holding it in place. That imbalance can develop over months or years, and by the time you notice the tilt, the wall has already been under stress for a while. Understanding what caused the lean is the first step in figuring out how to fix a leaning retaining wall, because the repair has to address the root cause, not just the visible angle.
Hydrostatic pressure from poor drainage
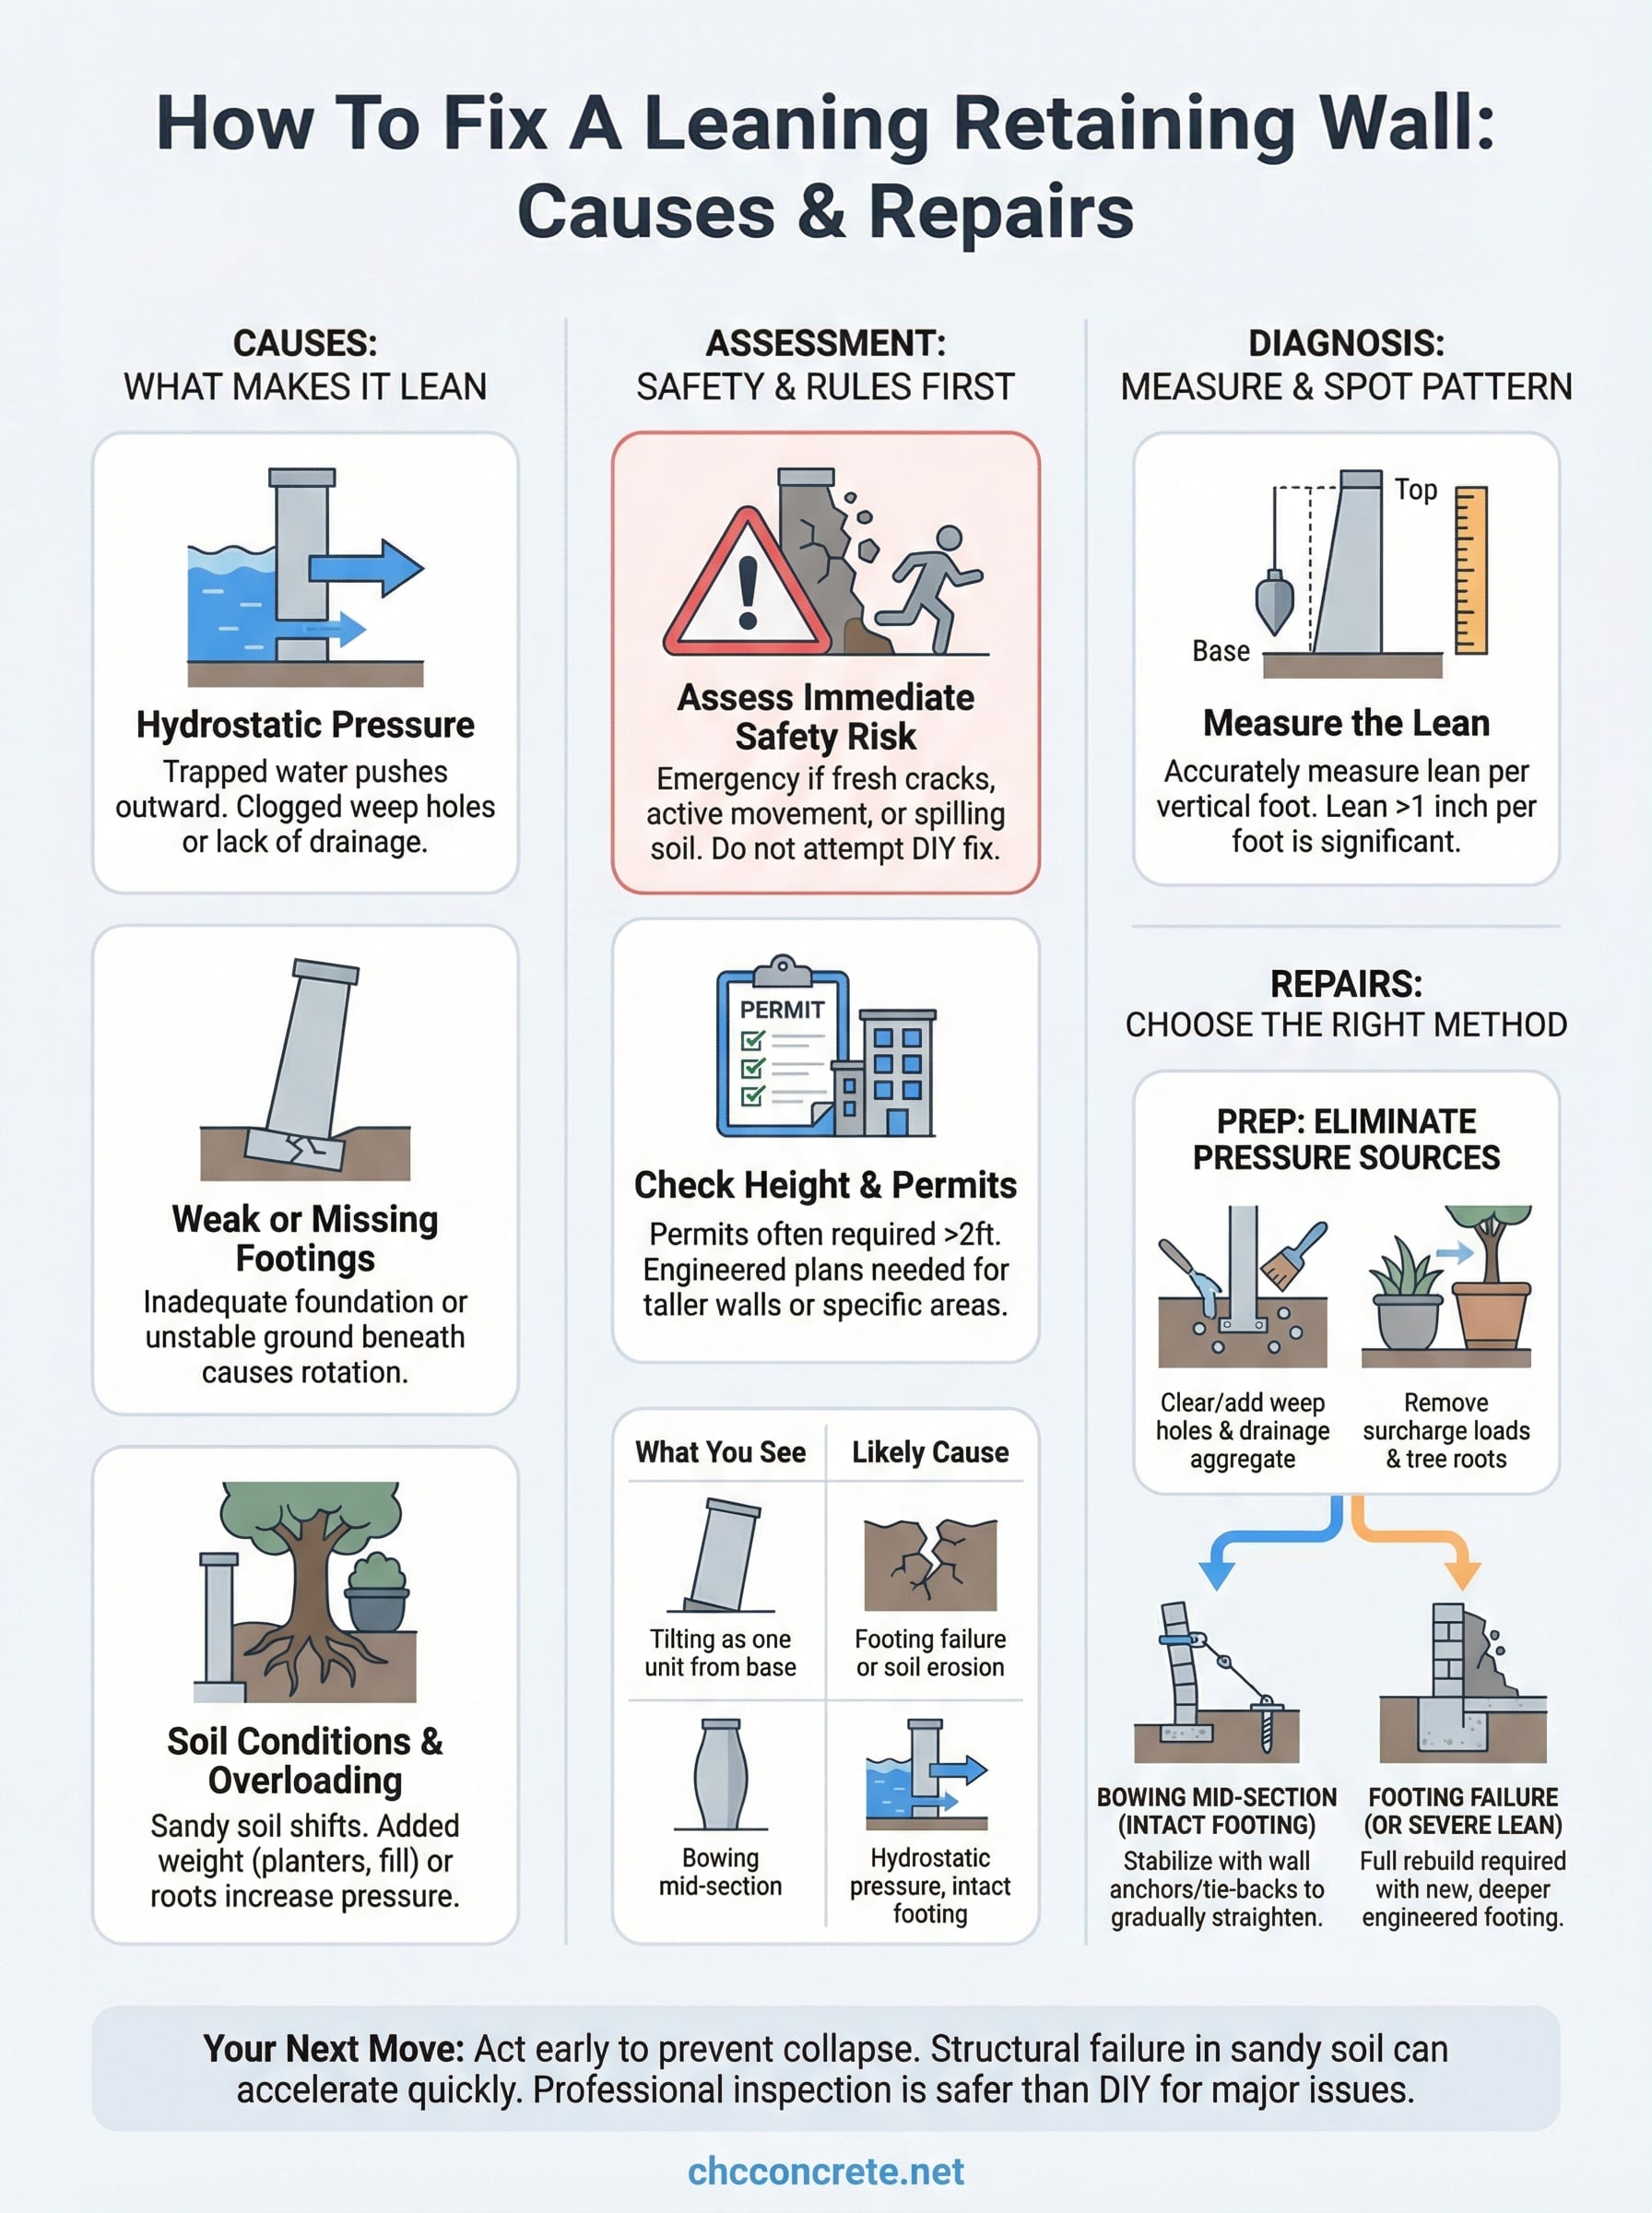
Water is the single most common culprit behind leaning retaining walls. When water accumulates in the soil behind your wall and has nowhere to drain, it creates hydrostatic pressure that pushes outward with significant force. A wall built without proper drainage aggregate, weep holes, or a perforated drain pipe behind it will eventually lose the fight against that pressure. In Southwest Florida, where hurricane season can dump several inches of rain in a matter of hours, this problem is especially severe.
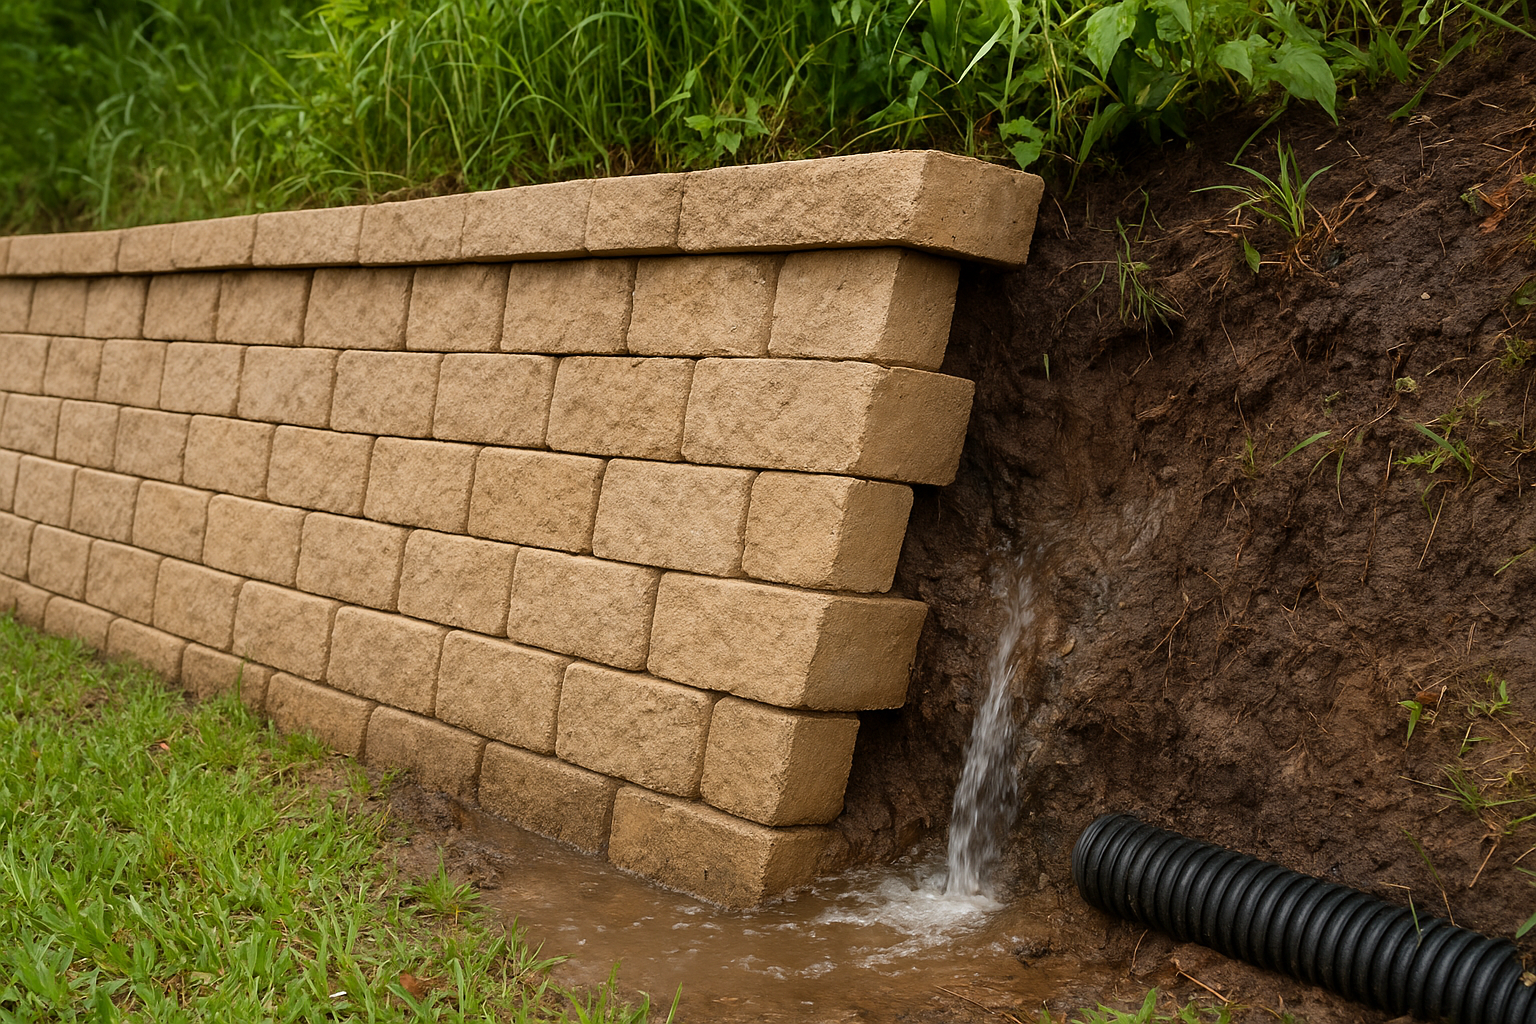
If your wall has no visible weep holes or drainage outlet, hydrostatic pressure is almost certainly contributing to the lean.
Weak or missing footings
Every retaining wall needs a footing that goes deep enough to anchor it against the lateral pressure of the soil it holds. Walls built with shallow footings, no footing at all, or footings poured on unstable ground will begin to rotate forward as the load increases over time. This is a common construction shortcut in residential projects where contractors underestimate the soil load or skip the engineering step entirely.
Signs of a footing problem often include:
- The wall tilting as a single unit from the base rather than bowing in the middle
- Visible gaps opening between the wall and the ground on the low side
- Cracks running horizontally near the base of a poured concrete wall
Southwest Florida soil conditions, age, and overloading
Sandy soil shifts, and that’s the reality of building and maintaining retaining walls in Fort Myers, Cape Coral, Estero, and Bonita Springs. Unlike clay-heavy soils that pack tightly around a footing, sandy soil erodes and migrates under pressure. When soil washes out beneath or around a footing, the wall loses its base support and begins to lean.
Even a wall with a solid footing can start to lean if the load on it increases beyond what it was originally designed to carry. This happens when homeowners add raised garden beds, heavy planters, or new fill soil on top of the retained area after construction. It also happens gradually as tree roots grow behind the wall and push outward, or as the wall material itself degrades through UV exposure, moisture cycling, and general age.
Step 1. Check safety, height, and permit rules
Before you touch anything or start planning how to fix a leaning retaining wall, you need to confirm that the wall is stable enough to work near safely and that your repair plan stays within local code requirements. Skipping this step puts people at risk and can result in costly fines or forced demolition of any unpermitted work.
Assess immediate safety risk
A leaning wall that is actively moving or showing fresh cracks after a rain event is in a different category than one that has been sitting at a slight angle for two years. If the wall has recently shifted, pull people and pets away from the base immediately. A collapsed retaining wall can move a significant amount of soil and debris very quickly, and the danger zone extends well beyond the wall’s height.
Look for these warning signs that indicate the wall needs to be treated as an emergency:
- Fresh horizontal cracks appearing near the base or mid-section
- Visible gaps between wall sections that weren’t there before
- Soil actively spilling through or around the wall face
- The wall moving noticeably when you apply light pressure
If any of these signs are present, do not attempt repairs yourself. Contact a licensed contractor for an emergency assessment before anyone works near the structure.
Know the height and permit thresholds
In Florida, most counties require a building permit for retaining walls over two feet in retained height, and some jurisdictions set that threshold at four feet. In Lee County, which covers Fort Myers, Cape Coral, and surrounding areas, walls above certain heights also require engineered drawings stamped by a licensed engineer before a permit will be issued. Check with your local building department before starting any structural repair work, not after.
Repairing an unpermitted wall that later fails can leave you personally liable for damages, especially if the collapse affects a neighbor’s property. A quick call to your county building department takes less than 15 minutes and removes that legal and financial risk entirely.
Step 2. Measure the lean and spot the failure pattern
Knowing exactly how far your wall has moved and where the movement is concentrated tells you what type of failure you’re dealing with. Different failure patterns point to different repair strategies, so taking accurate measurements before you choose a repair method saves you time and money in the long run.
How to measure the lean accurately
You don’t need specialized equipment for this. Hold a 4-foot level or a plumb bob against the wall face and measure the horizontal distance between the string or bubble and the wall surface at the base and top. Record the lean in inches per vertical foot of wall height. A wall that has moved 1 inch out of plumb per vertical foot has shifted significantly and likely requires more than a surface fix.
Repeat this measurement at three or four points along the wall’s length to determine whether the lean is uniform or localized to one section. Write your numbers down before you start any work so you have a clear baseline to compare against after repairs are complete.
A lean greater than 1 inch per foot of height on a wall over 3 feet tall should be evaluated by a licensed contractor before any DIY repair begins.
Reading the failure pattern
The location and shape of any cracking or visible movement tells you a great deal about what failed beneath the surface. Use the table below to match what you see to the likely cause:
| What you see | Likely cause |
|---|---|
| Wall tilting as one solid unit from the base | Footing failure or soil erosion beneath the footing |
| Bowing or bulging in the middle section | Hydrostatic pressure with no footing failure |
| Cracks at regular intervals along the length | Lateral soil load exceeding wall capacity |
| Separation at joints between wall sections | Settlement or shifting soil beneath specific sections |
Once you match your wall to a pattern, you have the foundation you need to approach how to fix a leaning retaining wall in a way that targets the actual source of the problem.
Step 3. Fix drainage and remove the forces pushing it
Before you repair the wall itself, you need to eliminate the forces that caused it to lean in the first place. Skipping this step is the most common reason repaired retaining walls fail again within a few years. When figuring out how to fix a leaning retaining wall, removing the source of pressure is just as important as the structural repair you apply to the wall itself.
Clear the weep holes and install drainage aggregate
Weep holes are small openings in the wall face that let trapped water escape before hydrostatic pressure builds up. Check each weep hole by probing it with a stiff wire or screwdriver. If water is not flowing freely after a rain event, the hole is clogged with compacted soil or debris and needs to be cleared completely.
If your wall has no weep holes at all, you need to add them. For a block or brick wall, drill 3-inch diameter holes at 6-foot intervals near the base using a hammer drill and masonry bit. Behind each opening, pack clean 3/4-inch crushed stone against the wall face to create a channel that directs water toward the opening. If you have access to the back of the wall, run a perforated 4-inch drain pipe wrapped in filter fabric along the footing and direct it away from the structure entirely.
A wall without a working drainage outlet will re-lean even after a full structural repair, so correcting drainage before anything else is non-negotiable.
Eliminate surcharge loads from the retained area
Surcharge loads are anything sitting on the soil directly behind the wall that adds downward pressure and pushes laterally against the structure. This includes heavy planters, stacked materials, vehicles parked near the edge, and fill soil added after the wall was originally built. Walk the top of the retained area and remove anything within three feet of the wall that is adding weight it was never designed to carry.
If the lean was partly driven by tree root growth behind the wall, you need to address the root system before any structural repair begins. Roots that already displaced the wall will keep growing and will work against your repair if you leave them untouched.
Step 4. Choose the right repair for your wall type
Once you’ve corrected drainage and removed the surcharge load, the actual wall repair depends on the material and the failure pattern you identified in Step 2. Knowing how to fix a leaning retaining wall correctly means matching the method to your specific situation rather than applying the same fix to every wall you encounter.
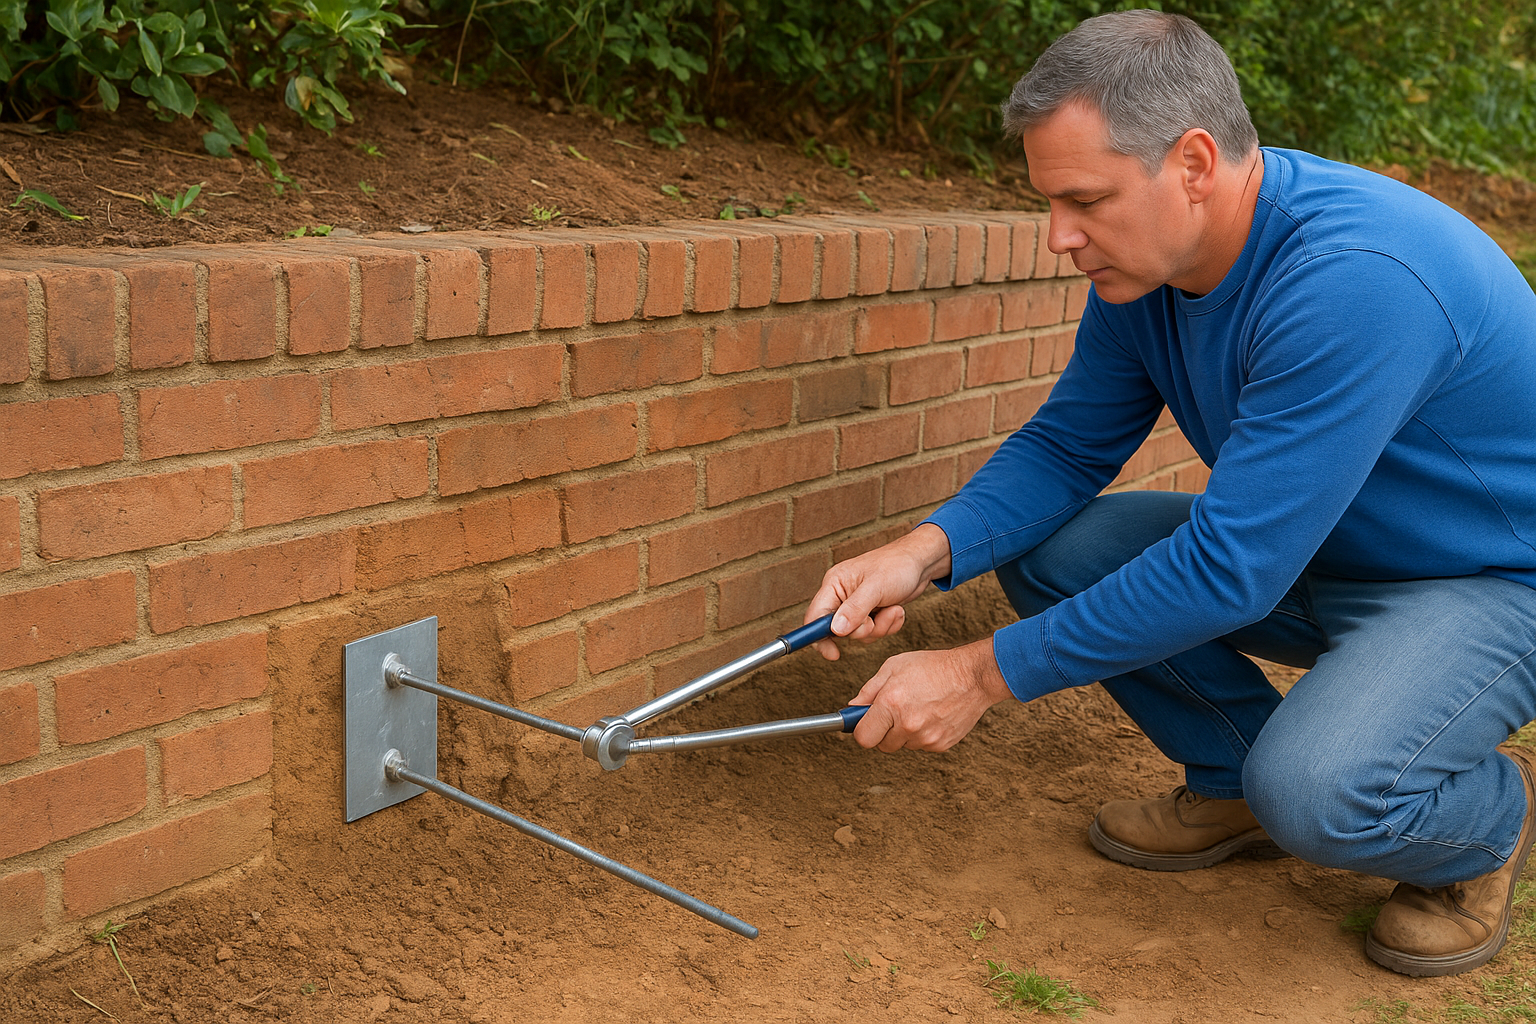
Repairing a block or brick wall that’s bowing mid-section
A wall that bows outward in the middle but still has an intact footing can often be stabilized with wall anchors or tie-backs. These steel rod systems connect the face of the wall to a buried plate driven into the retained soil several feet back. You drive the anchor rod through the wall at mid-height, attach the plate in the soil behind, and tighten the connecting nut to gradually pull the wall back toward plumb over time without requiring full demolition.
Use this method when:
- The footing is solid and undamaged at the base
- The wall has moved less than 2 inches out of plumb
- You have clear access to the retained soil directly behind the wall
Rebuilding a wall with footing failure
When the footing has failed or is missing entirely, no surface repair will hold. You need to excavate down to the base, remove the existing wall sections, and pour a new footing that reaches stable soil below the surface. In Southwest Florida, this typically means going at least 12 inches down and widening the footing base to distribute the load across more ground area, given how much sandy soil shifts under pressure.
Walls over 4 feet tall with footing failure should always be rebuilt with engineered plans, not patched in place.
For block or poured concrete walls, rebuild in lifts and place drainage aggregate directly behind each course as you go. For timber or railroad tie walls that have rotted at the base, full replacement is almost always the right call because the material has lost structural integrity and cannot be reinforced effectively.
Your next move
Knowing how to fix a leaning retaining wall gives you a real advantage, but the outcome depends on acting before the problem gets worse. A wall that has moved 1 inch out of plumb today will move further next rainy season. Correcting the drainage, removing the surcharge load, and choosing the right repair method for your wall type are all steps you can assess right now, before any additional shifting happens.
If your measurements revealed a footing failure, a wall over 4 feet tall, or movement that happened quickly after a storm, that’s your signal to bring in a licensed crew rather than attempt a repair alone. Structural failures in Southwest Florida’s sandy soil can accelerate without warning, and a professional inspection costs far less than a full collapse.
CHC Concrete works with homeowners throughout Fort Myers, Cape Coral, Estero, and Bonita Springs. Request a free retaining wall estimate and get a clear answer on what your wall actually needs.