


A stamped concrete patio can completely change how you use your outdoor space, and knowing how to install stamped concrete patio surfaces the right way starts with understanding what the project actually demands. It’s not just pouring concrete and pressing a pattern into it. The process involves precise timing, proper base preparation, and materials that hold up under real conditions. Skip a step, and you’ll see it in the cracks, peeling, or uneven surfaces within a year or two.
This guide walks you through the full process, from site prep and tools to stamping techniques and curing. Whether you’re planning to tackle this yourself or you want to understand exactly what a contractor should be doing on your property, every stage matters. We’ve laid out the details so you can make informed decisions and avoid the costly mistakes we see regularly on residential projects across Southwest Florida.
At CHC Concrete, we install and repair stamped concrete patios throughout Fort Myers, Cape Coral, Estero, and Bonita Springs. Our crews deal with sandy soils, heavy rain, and intense UV exposure daily, conditions that punish poor concrete work fast. That hands-on experience with Florida-specific challenges is exactly what shaped the advice in this guide.
What to know before you start
Before you install stamped concrete patio surfaces on your property, you need a clear picture of what the job actually requires. Stamped concrete is not a beginner-friendly weekend project. It demands specific tools, correct timing during the pour, and a solid understanding of what can go wrong at each stage. Going in unprepared is the fastest way to end up with a patio that looks off and fails within a few seasons.
If you start stamping before the concrete reaches the right stiffness, the impressions will blur, collapse, or have lifted edges as the slab continues to set.
Tools and materials you’ll need
Having the right equipment on-site before you pour is non-negotiable. If you’re mid-pour and realize you’re missing a texture mat or a float, your window closes fast. Concrete doesn’t wait.
Gather these before you start:
- Concrete stamp mats (rent or buy enough to cover your slab with overlap)
- Color hardener or integral pigment
- Release agent (powder or liquid) to prevent stamps from bonding to the surface
- Bull float and hand floats
- Tamper or plate compactor for base prep
- Wire mesh or rebar for reinforcement
- Plastic sheeting for curing
- Concrete sealer (penetrating or film-forming, depending on your finish goal)
- Edging tools and a screed board
Permits and site conditions
Many Florida counties require a permit for concrete flatwork that exceeds a certain square footage or sits within a specific setback distance from a property line or structure. In Fort Myers, Cape Coral, and surrounding areas, checking with your local building department before you dig or pour protects you from fines and forced removal. Pull the permit yourself or confirm your contractor has it handled. That step takes a day or two and saves real money if an inspector flags unpermitted work later.
Your site conditions matter just as much before materials get ordered. Soil type, existing drainage patterns, and proximity to tree roots all affect how you prep the base and what slab thickness the project actually needs.
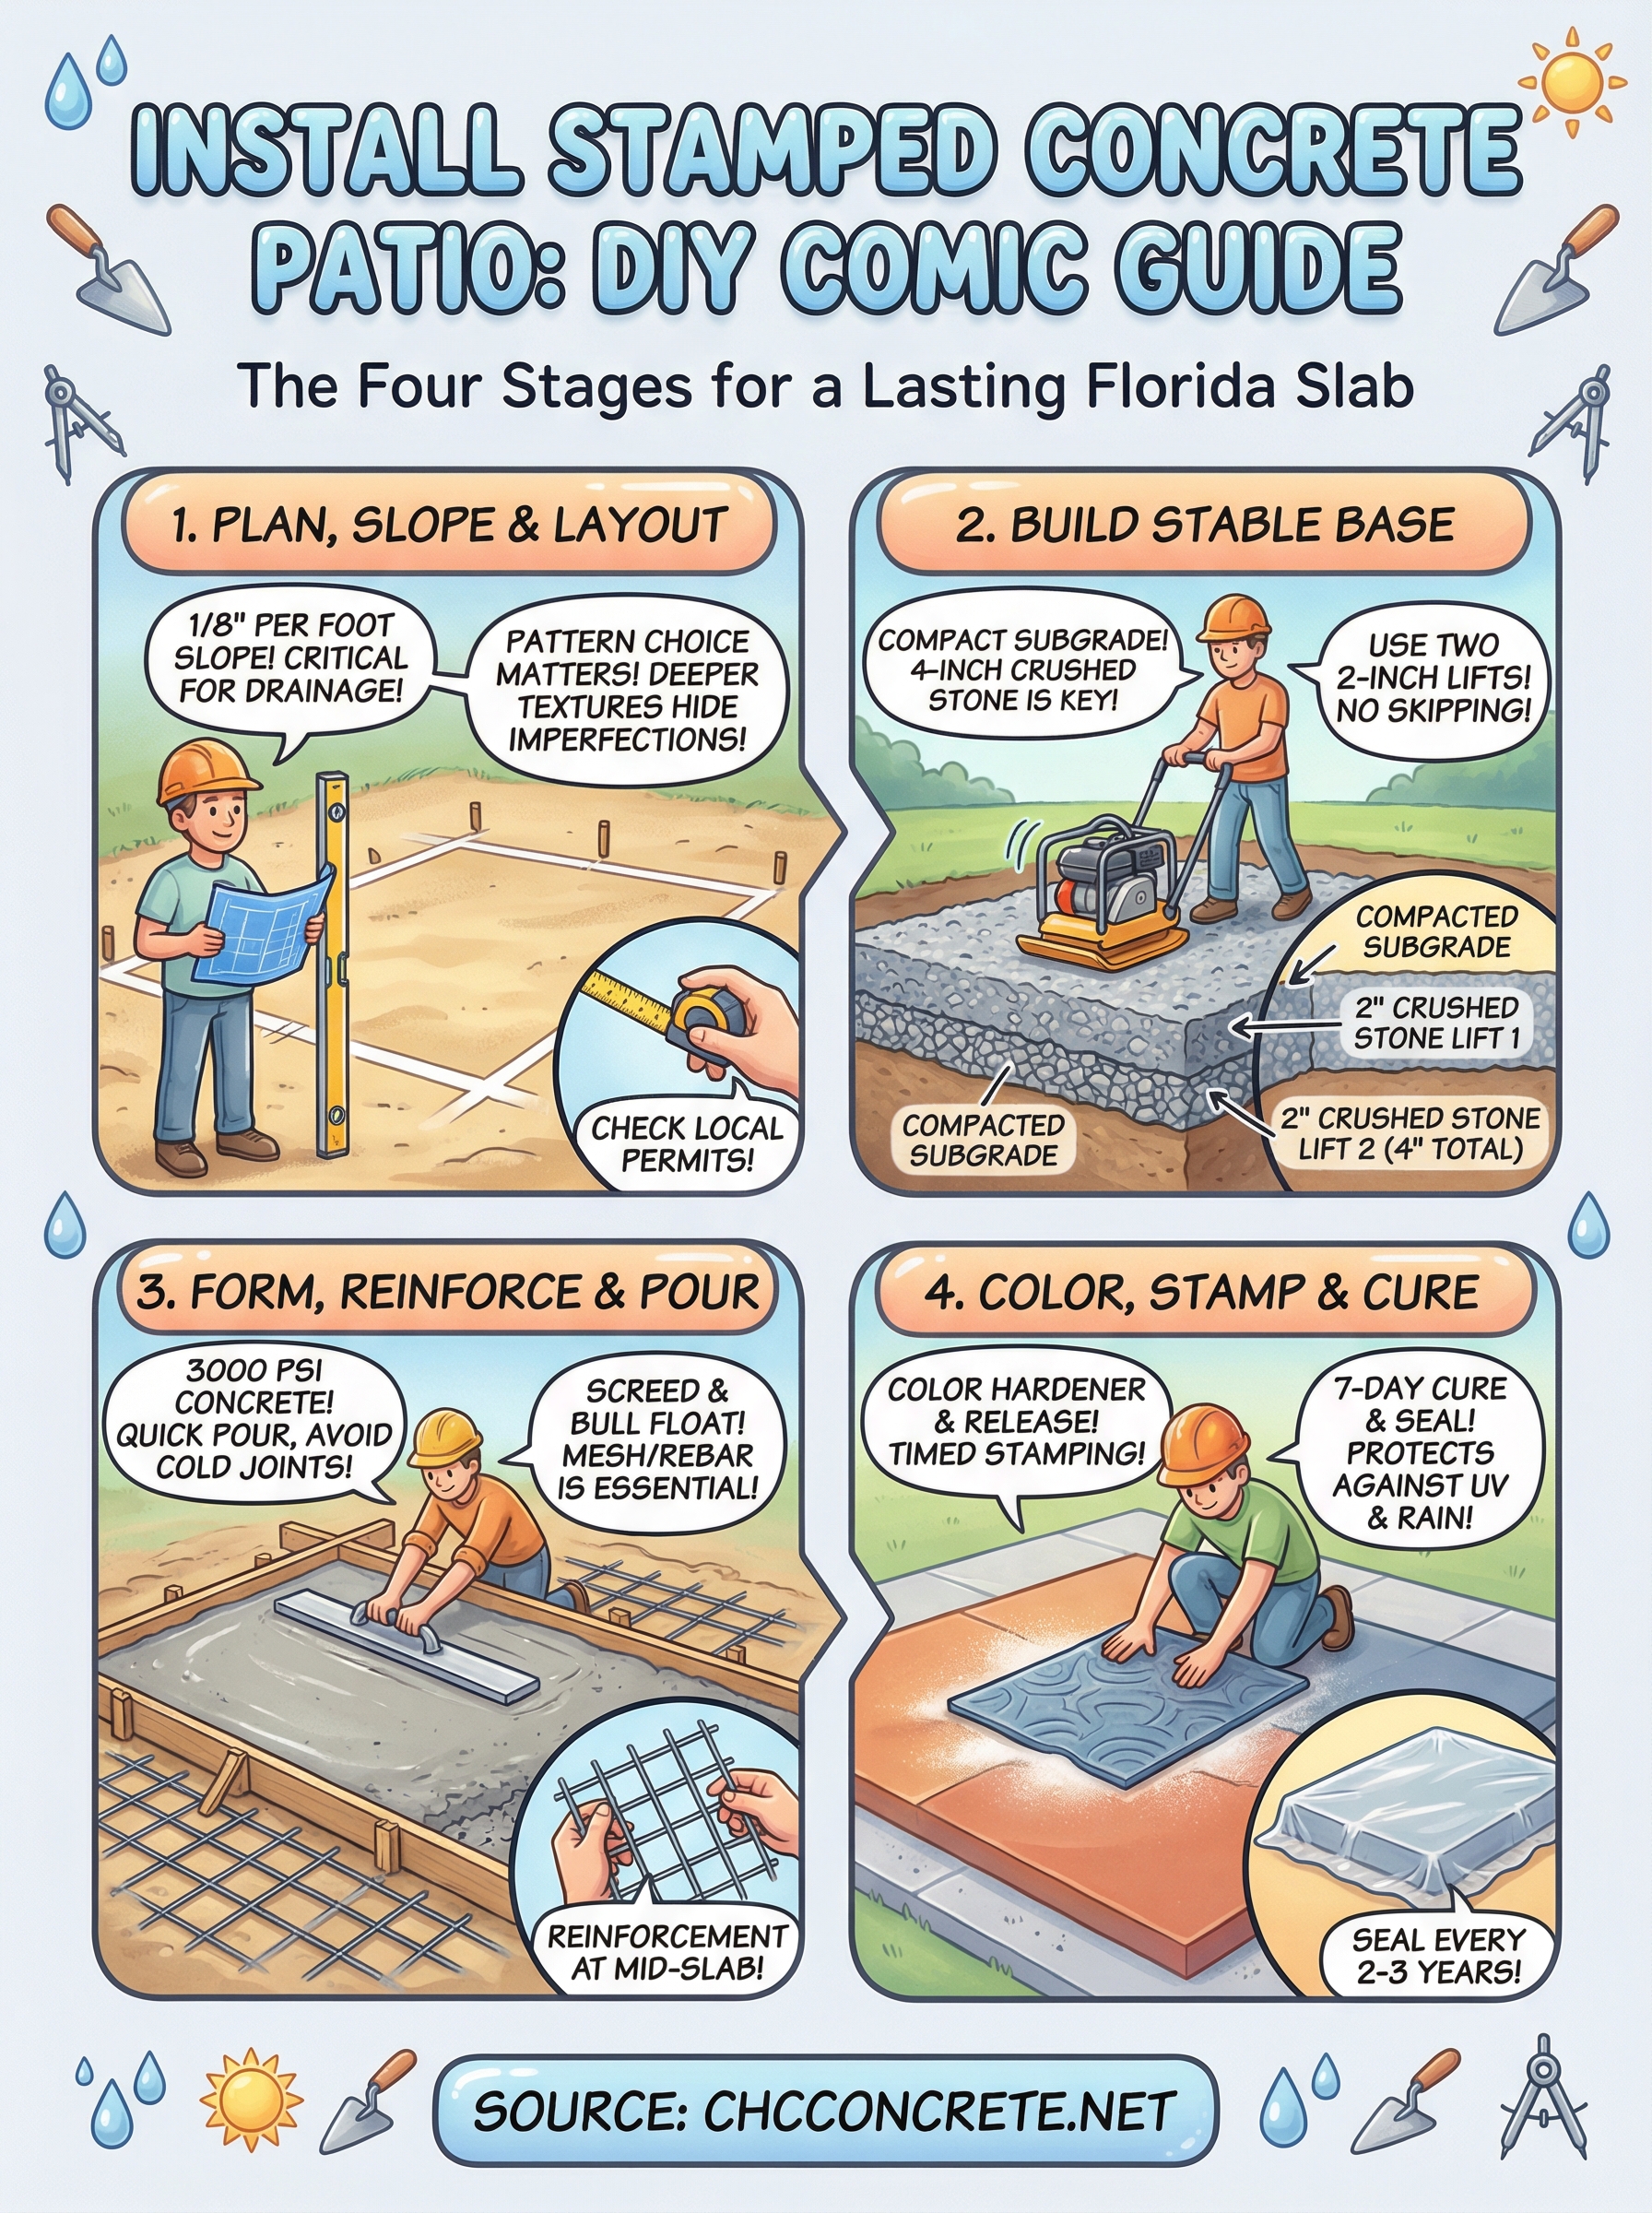
Step 1. Plan the design, slope, and layout
Good planning before you install stamped concrete patio surfaces saves you from expensive corrections after the pour. At this stage, you’re making decisions that directly affect how the finished slab looks and how long it lasts. Pattern selection, dimensions, and drainage slope all need to be locked in before you touch the ground.
Choose your pattern and color
Your pattern choice affects more than aesthetics. Deeper texture patterns, like cobblestone or flagstone, hide minor surface imperfections better than shallow slate or wood plank designs. Integral color mixed into the concrete gives more consistent results than color hardener alone, but hardener adds surface density and UV resistance. Many projects use both for depth and long-term durability.
Common pattern categories to consider before you order materials:
- Ashlar slate or flagstone: works well around pool decks and outdoor living areas
- Cobblestone or brick: suits driveways and high-traffic entry zones
- Wood plank: pairs well with modern or farmhouse-style homes
Set the correct drainage slope
Every patio slab needs a minimum slope of 1/8 inch per foot directing water away from your home’s foundation or structure. In Southwest Florida, where heavy rain is routine, insufficient slope causes pooling water and accelerated surface erosion. Use a level and tape measure to map your grade across the full footprint before setting forms.
A slope that looks barely noticeable to the eye can move a significant volume of water during a heavy rain event, which is exactly what you want.
Mark your layout with stakes and string lines, and confirm all measurements twice before you order concrete or cut your forms to length.
Step 2. Build a stable base in sandy soil
Sandy soil in Southwest Florida shifts under load, especially after heavy rain saturates the ground. Before you install stamped concrete patio slabs over unstable subgrade, you need to remove loose material and replace it with a compacted base that doesn’t move. Skipping this step is the single biggest reason patios crack and sink early.
Excavate and compact the subgrade
Dig down at least 4 inches below your finished slab grade, and go deeper if you hit roots, organic material, or visibly soft spots. Remove everything loose before you compact. Use a plate compactor on the remaining subgrade before adding any fill material.
A subgrade that feels firm underfoot is not the same as a mechanically compacted subgrade. Use the plate compactor on every project, no exceptions.
In Florida’s sandy conditions, this step matters more than in areas with denser native soil. Skipping mechanical compaction leads to differential settlement, which causes the kind of cracking that shows up within one to two seasons.
Add compacted gravel fill
Use 3/4-inch crushed stone as your fill layer and compact it in two-inch lifts to reach a finished depth of 4 inches. Compacting in lifts rather than all at once produces consistent density from bottom to top. Follow this sequence before setting your forms:
- Spread the first 2-inch lift of crushed stone evenly across the footprint
- Compact with the plate compactor until the surface feels firm and stable
- Add the second 2-inch lift
- Compact again and verify depth with a screed board at multiple points
Step 3. Form, reinforce, and pour the slab
With your base compacted and ready, you can set forms and schedule your concrete delivery. This stage determines the slab’s final thickness, edge definition, and structural integrity. Rushing through forming and reinforcement before you install stamped concrete patio surfaces is where projects lose structural strength before the first bag of cement is even opened.
Set your forms and place reinforcement
Lumber forms, typically 2×4 for a 4-inch slab, need to be staked firmly and checked for level along your planned slope. Pull a string line across opposite form edges to confirm the screed path before you lock stakes in place. Once forms are set, lay your reinforcement across the footprint using this sequence:
- Place 6×6 wire mesh or rebar on wire chairs at mid-slab height (2 inches off the base)
- Space rebar at 12-inch centers for patios that carry foot traffic only; go to 6-inch centers near load points
- Overlap mesh sections by at least 6 inches and tie intersections with wire
- Keep reinforcement 3 inches back from all form edges to prevent corrosion exposure
Pour, screed, and float the surface
Order 3,000 PSI concrete minimum for residential patios in Florida. Have your crew move concrete quickly from the chute to avoid cold joints from partial pours setting up before the next load arrives. Screed the surface level with the forms, then bull float in overlapping passes to close the surface and push aggregate down before any stamping begins.
Stop floating as soon as bleed water disappears from the surface. Working wet concrete drives water back up and weakens the top layer permanently.
Step 4. Color, stamp, cure, and seal
This is the stage that defines how your patio looks and how long the finish lasts. To install stamped concrete patio surfaces that hold their pattern and color through years of Florida sun and rain, you need to work through coloring, stamping, curing, and sealing in the correct order without skipping steps or rushing between them.
Apply color and stamp at the right moment
Broadcast color hardener evenly across the surface in two passes, then float it in until the powder absorbs fully. Once the hardener sets into the surface, apply your release agent in a consistent thin coat across the entire area. The release agent prevents stamp mats from bonding and creates the tonal variation that makes stamped patterns look natural.
Test surface firmness before you stamp by pressing your thumb firmly into the concrete. A clean 3/4-inch impression without surrounding collapse means the slab is ready to work.
Work your stamp mats in a consistent direction, pressing firmly and evenly across each mat before moving to the next. Overlap mat edges by at least two inches to prevent visible seam lines between impressions.
Cure and seal the finished slab
Cover the slab with plastic sheeting or a liquid curing compound within one hour of finishing the stamp work. Keep the slab covered for a minimum of seven days, since Florida’s heat pulls moisture out of concrete faster than in cooler regions, and surface strength depends on that retained water.
Apply a penetrating or film-forming sealer after curing ends. Reapply sealer every two to three years to protect against UV fading, surface absorption, and wear from foot traffic and seasonal rain.
Wrap-up and your next step
To install stamped concrete patio surfaces that last through years of Florida heat, rain, and shifting soil, every stage in this guide needs to happen in order. Base compaction, correct slope, reinforcement placement, and timed stamping are not optional steps you can streamline. Each one connects directly to how the slab performs five years from now.
Southwest Florida conditions make this work harder than most other regions. Sandy subgrade, intense UV exposure, and heavy seasonal rain hit concrete surfaces faster than homeowners expect. Getting the details right from the start protects your investment and eliminates the costly repairs that follow shortcuts.
If you want a professional crew to handle your patio project in Fort Myers, Cape Coral, Estero, or Bonita Springs, CHC Concrete is licensed, insured, and experienced with exactly these conditions. Visit CHC Concrete to request a free on-site estimate and see what the right process looks like from start to finish.