

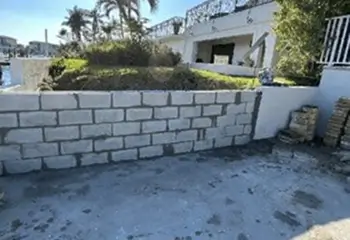
Lowe’s carries one of the widest selections of retaining wall blocks you’ll find at any big-box store, which makes it a solid starting point if you’re planning a wall project. But standing in that aisle, or scrolling through their website, you’ll quickly realize that Lowe’s retaining wall blocks come in a range of styles, sizes, and price points that can feel overwhelming without some direction. Picking the wrong block for your soil type or wall height isn’t just a waste of money, it’s a structural problem waiting to happen.
At CHC Concrete, we build retaining walls across Fort Myers, Cape Coral, Estero, and Bonita Springs. We know what holds up in Southwest Florida’s sandy soil and heavy rain seasons, and we know what doesn’t. That hands-on experience is exactly what shaped this guide. Whether you’re planning a full DIY retaining wall build or just trying to understand your options before hiring a pro, this article walks you through how to choose the right blocks at Lowe’s, what materials you’ll need, and the step-by-step process for building a retaining wall that actually lasts.
What Lowe’s retaining wall blocks you can buy
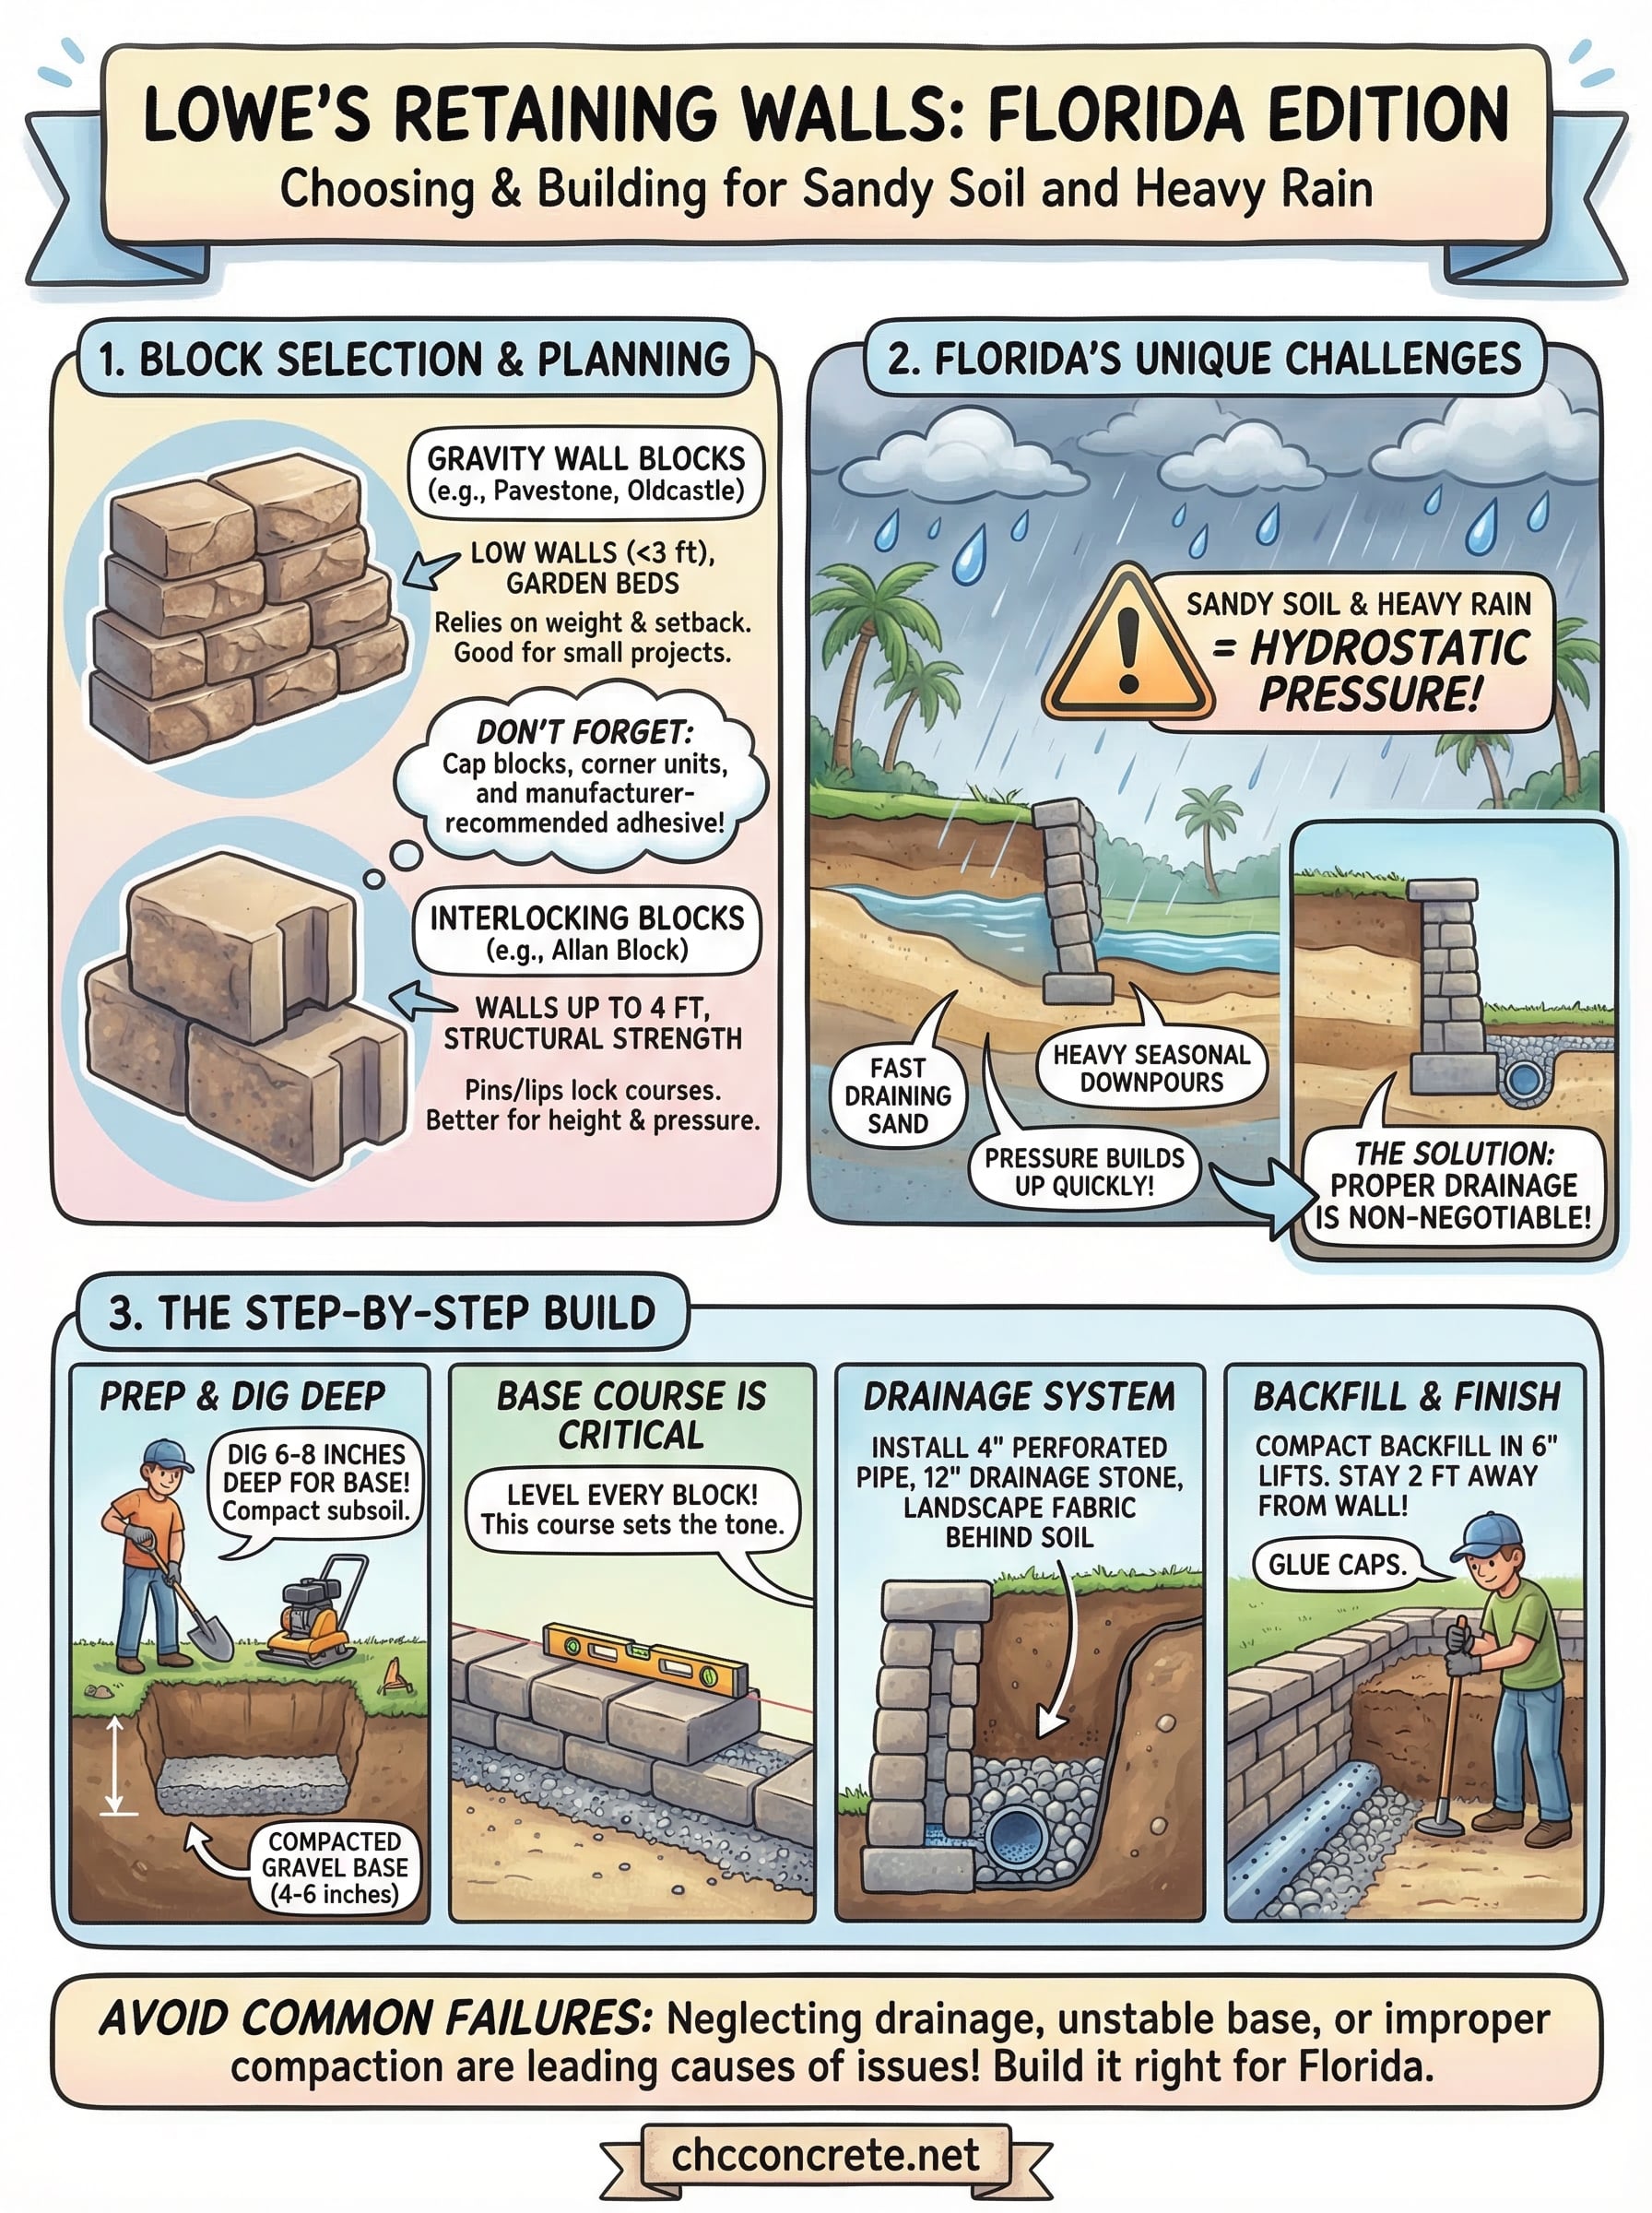
Lowe’s retaining wall block selection covers everything from small garden edging units to heavy-duty interlocking blocks designed for walls over four feet tall. When you’re shopping for Lowe’s retaining wall blocks, the main decision points are block weight, interlocking design, and face texture. Getting familiar with the product categories before you walk into the store will save you time and prevent you from buying a block that isn’t rated for the height or load you’re working with.
Standard gravity wall blocks
Standard gravity blocks are the most common option at Lowe’s and the easiest starting point for most homeowners. Brands like Pavestone and Oldcastle appear frequently on their shelves, and their standard units typically measure around 8 to 12 inches wide and 4 inches tall with a split-face finish that mimics natural stone. These blocks rely on their own weight and a slight backward setback per course to hold back the soil behind them. They work well for garden beds, low landscape borders, and walls under three feet tall.
For walls in this range, here’s what you’ll typically find at Lowe’s:
| Block Type | Approximate Size | Best Use | Approx. Price Per Block |
|---|---|---|---|
| Pavestone standard wall block | 12″ x 4″ x 6″ | Garden walls up to 3 ft | $2-$4 |
| Oldcastle garden wall block | 8″ x 4″ x 4″ | Low borders, edging | $1-$2.50 |
| Tumbled wall block | 9″ x 4″ x 5″ | Curved walls, landscape beds | $2-$3.50 |
Prices fluctuate based on your local store and current inventory, so always verify pricing in your Lowe’s store or on their website before you finalize your budget.
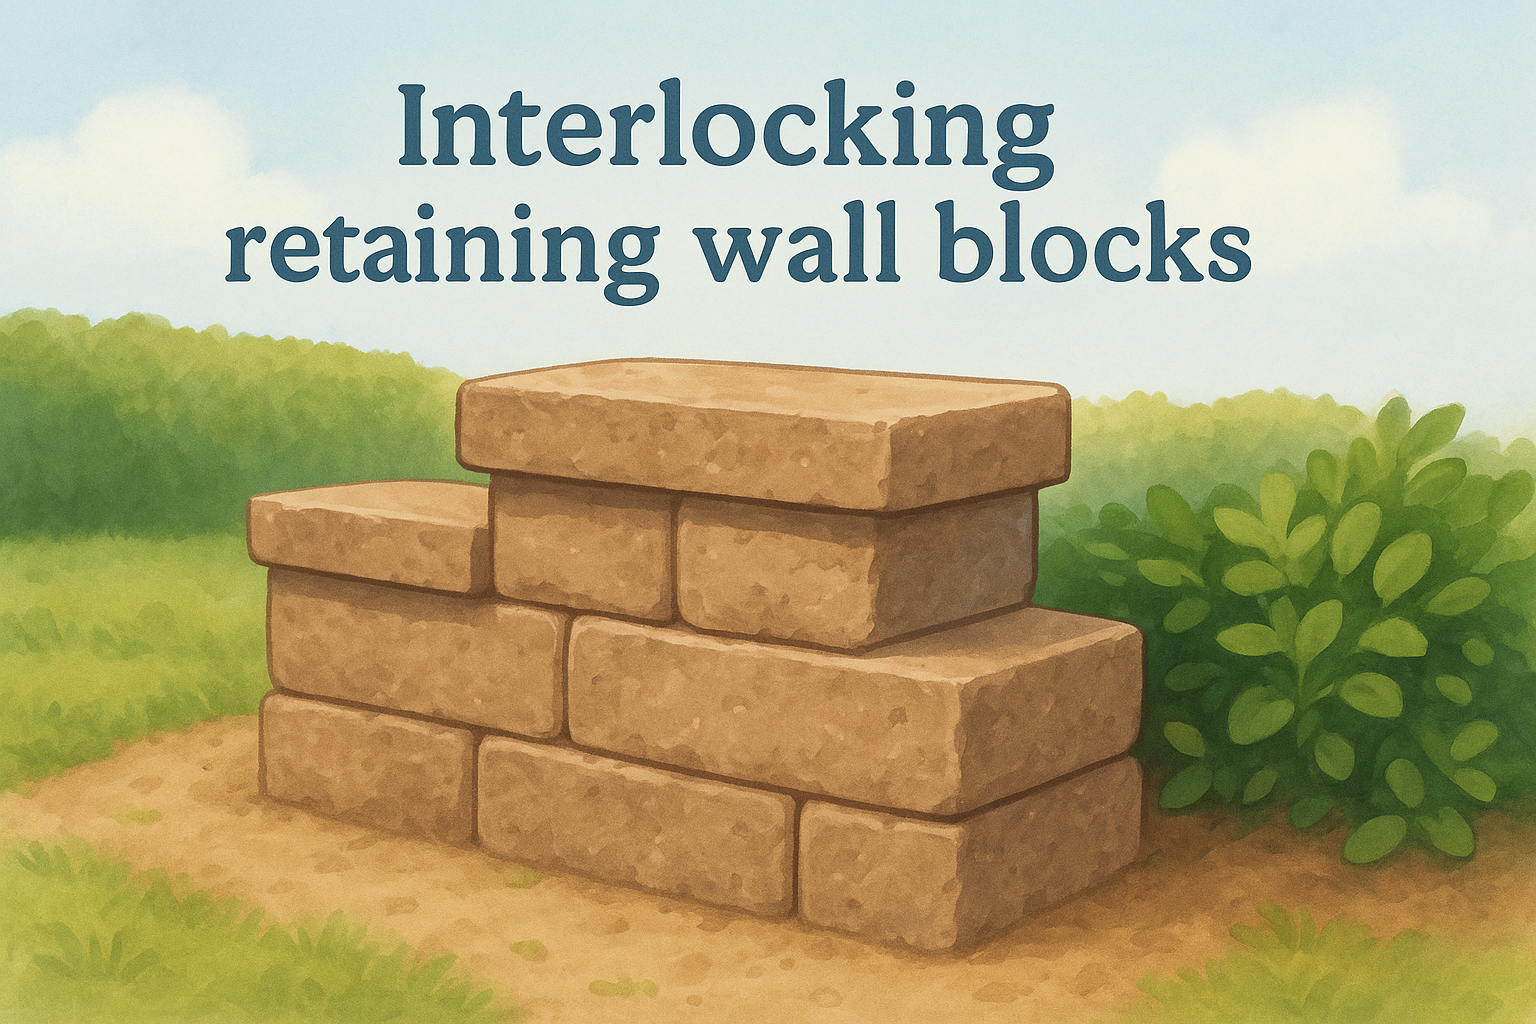
Interlocking retaining wall blocks
Interlocking blocks use a lip or pin system on the back edge that locks each course to the one below it. Allan Block is the most recognized brand in this category at Lowe’s, with their AB Classic and AB Fieldstone units being the most widely stocked. These blocks offer more structural strength per course because the interlock reduces the risk of the wall shifting outward under soil pressure. Most interlocking systems support walls up to 4 feet tall before you need engineering input or a permit.
These units cost more per block, typically between $4 and $8 each, but you spend less on supplemental reinforcement materials because the system handles lateral soil pressure more efficiently on its own. For any wall taller than three feet in Florida’s wet seasons, an interlocking block is the smarter choice over a basic gravity block. The extra upfront cost is worth it.
Cap blocks and corner units
Cap blocks sit on top of your finished wall and give it a clean, defined edge. Most Lowe’s cap blocks are sold separately from the main wall block line, so build them into your material count from the start. Corner units are specially shaped blocks that let you turn a 90-degree angle without cutting, and not every product line includes matching corners and caps, so confirm availability before you commit to a specific block brand.
Lowe’s also stocks manufacturer-recommended adhesive and block pins designed specifically for retaining wall assembly. Using the adhesive matched to your chosen block brand ensures the best bond on cap and corner installations and prevents shifting over time. Pick those up in the same trip so you have everything on hand before your build starts.
Plan your wall for Florida rain and sandy soil
Southwest Florida’s combination of heavy seasonal rain and loose sandy soil creates specific challenges that most DIY retaining wall guides ignore. Before you start comparing Lowe’s retaining wall blocks or calculating how many you need, you have to understand what your wall is actually fighting against. A wall that holds perfectly in dry conditions can lean, crack, or fully collapse after the first major rainstorm if the drainage and foundation aren’t built for this region.
Account for drainage before you pick a block height
Water pressure behind a retaining wall, called hydrostatic pressure, builds up fast in Florida’s rainy season. Sandy soil drains faster than clay, which works in your favor, but that advantage disappears if your wall has no planned exit route for water. Every retaining wall you build here needs a deliberate drainage system, whether that’s crushed gravel backfill, perforated pipe, or weep holes built into the lower courses.
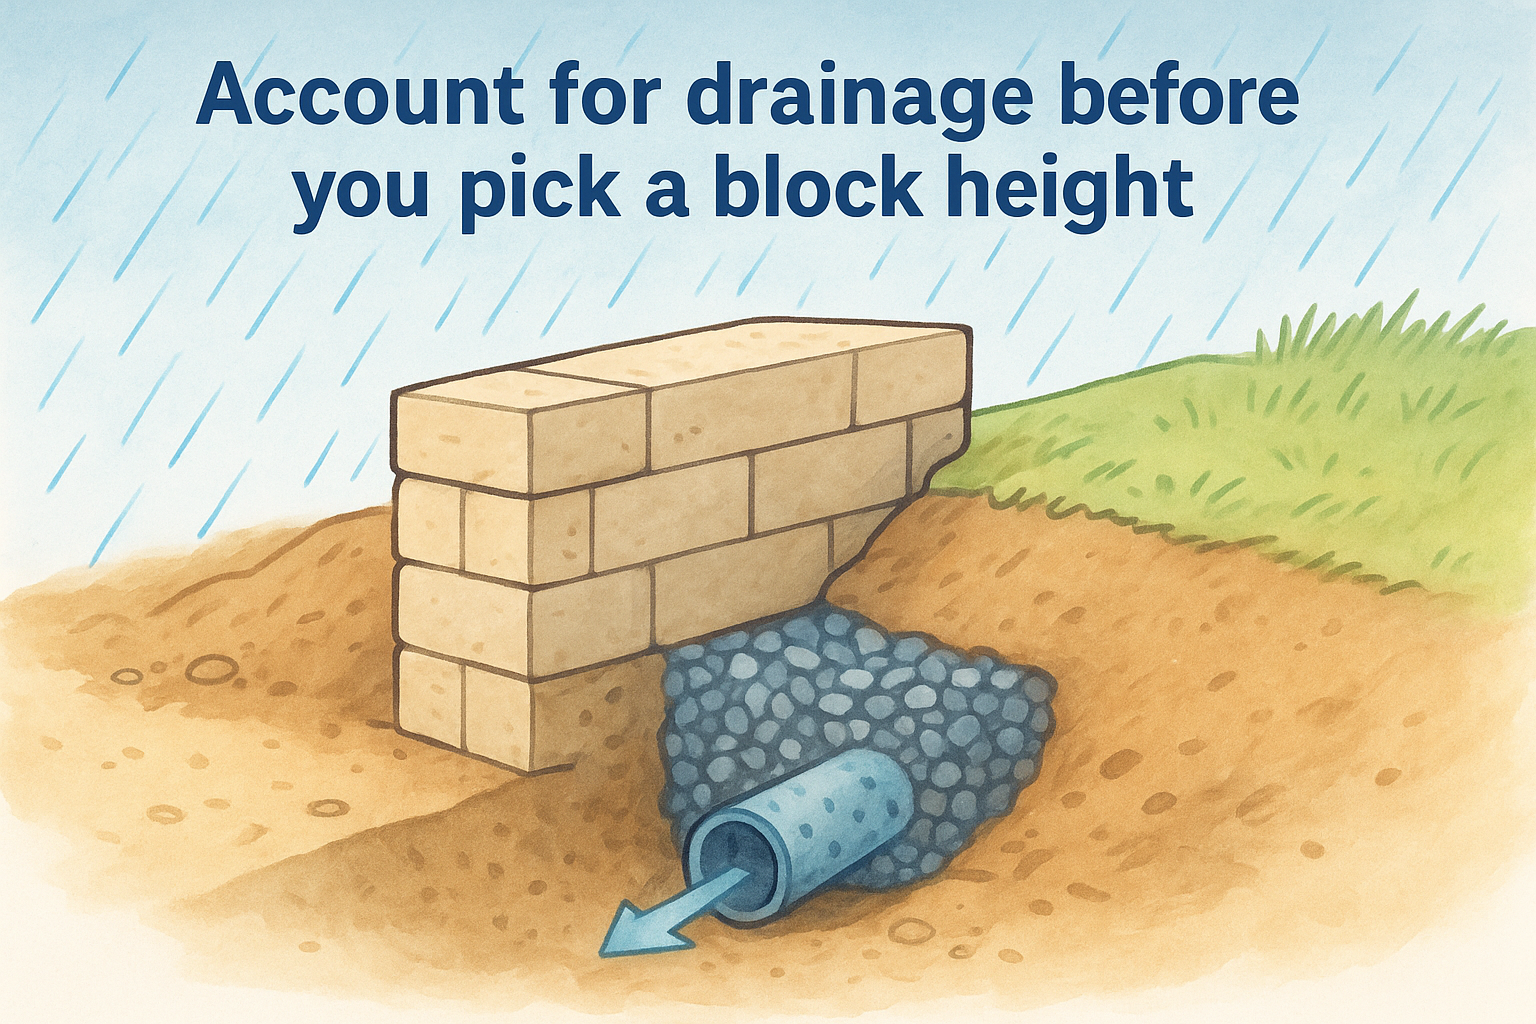
Skipping drainage on a Florida retaining wall is the single most common reason walls fail within one to three years of installation.
For any wall retaining more than two feet of soil, run through this drainage checklist before you finalize your block selection:
- Place at least 12 inches of crushed gravel or drainage stone directly behind the wall
- Install a 4-inch perforated pipe at the base of the gravel layer, sloped to carry water away from the wall
- Confirm your yard grading directs surface runoff away from the back of the wall
- Verify your chosen block system allows water to pass through or weep at the base course
Assess your soil and setback requirements
Florida’s sandy soil shifts more than denser soils in other parts of the country, particularly when it gets saturated after heavy rain. This means your base trench needs to go deeper than the minimum recommendations printed on most block packaging. For most residential walls in Fort Myers, Cape Coral, or Bonita Springs, plan to bury your base course 6 to 8 inches deep, not the 4 inches some general guides recommend.
You also need to account for setback, meaning the amount each course steps back into the slope. Most interlocking block systems at Lowe’s are designed for roughly a 1-inch setback per course, which works for moderate slopes. For steeper grades, read the manufacturer’s installation specs on the block packaging before you buy anything. Building on a slope steeper than 2:1 in sandy soil without an engineering review creates a serious failure risk that no block brand or installation technique fully overcomes.
Estimate materials and budget before you shop
Getting your material count right before you visit the store saves you from making two or three extra trips or buying far more blocks than the project requires. Most homeowners underestimate the total cost because they only price the blocks and forget the drainage stone, base gravel, adhesive, and caps. Running a full estimate before you shop keeps your budget honest and your project on schedule from day one.
Calculate your block count
To figure out how many blocks you need, you have to convert your wall dimensions into a usable number. Measure your wall’s total length and planned finished height in inches, then use the specific block dimensions from your chosen product to calculate courses and total units. Follow these steps in order:
- Divide your wall height by the block height to get the number of courses
- Divide your wall length by the block length to get blocks per course
- Multiply courses by blocks per course for your base total
- Add 10% for cuts, breakage, and corner adjustments
For example, a 20-foot-long wall at 36 inches tall using a standard 4-inch-tall block gives you 9 courses and 20 blocks per course, for a base total of 180 blocks. Add your 10% buffer and shop for 198 blocks minimum before you factor in caps.
Always count your cap blocks separately, since Lowe’s sells them as a distinct product line from the main wall block units.
Build your full shopping list
Your block count is just the starting point. Every retaining wall project requires several supporting materials that add to your total cost and need their own line items in your budget. Use this checklist when you pull together your Lowe’s retaining wall blocks order:
- Compactable gravel base: 4 to 6 inches deep across the full trench length
- Drainage stone: Washed crushed stone for backfill, typically a 57 or 89 stone grade
- Perforated drain pipe: 4-inch diameter, enough to run the full wall length
- Landscape fabric: Placed between soil and drainage stone to stop sand migration
- Block adhesive: Manufacturer-matched product for cap and corner bonding
- Block pins or clips: Required for interlocking systems; verify specs on your specific product
For a 20-foot wall at 3 feet tall, budget roughly $400 to $700 for the blocks themselves and an additional $150 to $300 for drainage materials, base gravel, pipe, and adhesive. Florida’s sandy soil conditions make those drainage materials non-negotiable, so don’t cut them from your estimate to save money upfront.
Prep the site and dig a level base trench
Site preparation determines whether your wall stands straight for decades or starts shifting after the first rainy season. Before you haul a single Lowe’s retaining wall block to the build site, your ground needs to be marked, cleared, and excavated to the right depth. Skipping this step is what leads to the uneven walls and failed bases that most homeowners regret within two or three years of finishing what looked like a solid build.
Mark your wall line and clear the area
Start by driving stakes into the ground at each end of your planned wall line and stretching a string line tightly between them. This string becomes your reference for every measurement that follows, so take the time to get it straight. Pull up any grass, roots, or debris within 12 inches on both sides of your string line. Tree roots in Southwest Florida soil tend to run wider and shallower than in most other regions, so probe the area with a spade before you trust that the surface is clear.
Once your string line is set, use marking paint or chalk to trace the full wall footprint on the ground. Your trench width should match the full depth of your chosen block plus 6 additional inches on the drainage side for gravel room. Marking the full footprint before you dig prevents you from cutting a trench that’s too narrow to work in once the gravel goes down.
Dig to the right depth for Florida conditions
Florida’s sandy soil requires you to bury your base course deeper than standard guides recommend. Most general retaining wall instructions tell you to go 4 inches deep for the base course, but in Fort Myers, Cape Coral, or Bonita Springs, dig to 6 to 8 inches below finished grade. That extra depth anchors your first course in undisturbed soil instead of the loose surface layer that shifts during saturation.
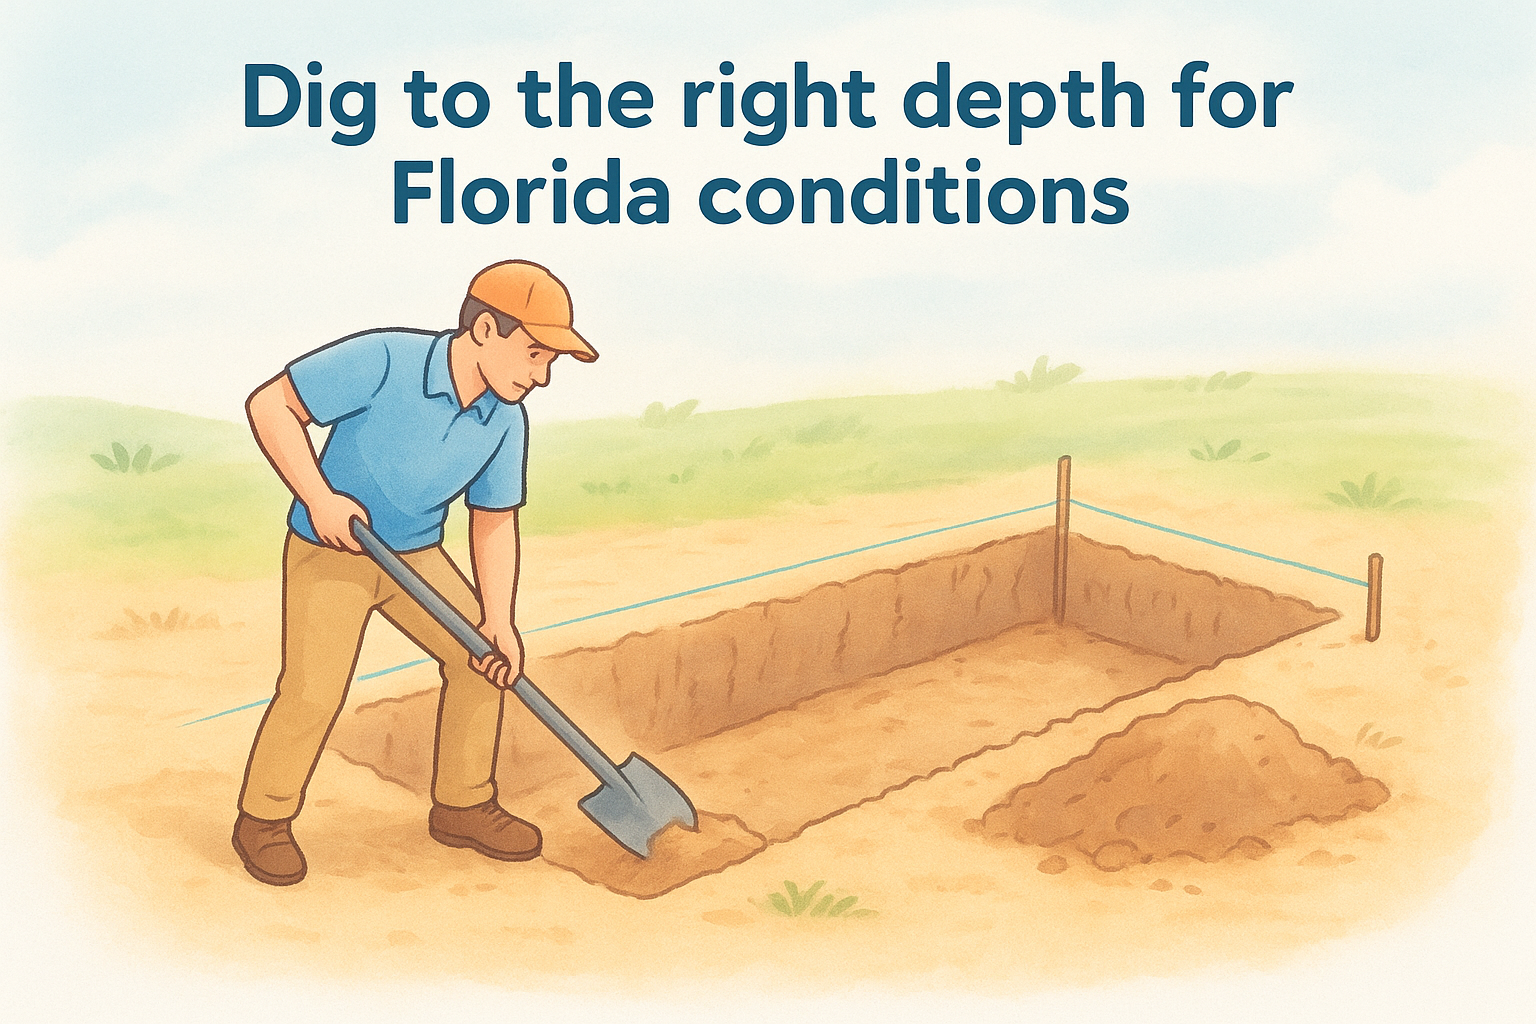
Dig your trench at least 1 inch deeper than you think you need, because it is far easier to add a bit more gravel than to re-excavate after you have already set your base.
Use a hand tamper or plate compactor to firm up the trench bottom before you add any gravel. Loose soil at the base is as bad as no base at all in wet conditions. Once you compact the subsoil, add your compactable gravel in 2-inch lifts, tamping each lift firmly before adding the next, until you reach your planned base depth.
Build the first course so the wall stays straight
Your base course is the most important row of the entire wall. Every course above it inherits whatever errors you introduce at the bottom, so a first course that’s slightly off level or unevenly spaced will push every course further out of alignment as you build up. Take more time on this row than any other part of the project, and the rest of the wall goes together much faster and cleaner.
Set your first block and establish your reference line
Start at one end of your trench and place your first block directly on the compacted gravel base, centered on your marked wall line. Press it firmly down with both hands and check that it sits flush on the gravel without rocking. From that anchor block, run a string line along the front face of the wall at the height of your first course and stake it tightly at the far end. This string becomes your alignment guide for every block in the row, so pull it taut enough that it doesn’t sag in the middle.
A string line that sags even half an inch in the center will cause a visible bow in your finished wall that no amount of adjustment on upper courses will fix.
Place each subsequent block with its front face touching the string without pushing it outward. Lowe’s retaining wall blocks from brands like Allan Block and Pavestone are consistent enough in dimension that a tight string line gives you reliable alignment across the full course, as long as you don’t let blocks drift forward or backward as you set them.
Check level in both directions on every block
Each block needs to be level side to side and front to back before you move to the next one. Use a standard 4-foot level across the top of each block and tap it with a rubber mallet to adjust. For blocks that sit too high, pull them up and remove a small amount of gravel beneath them rather than trying to force them down with the mallet. Forcing blocks down without removing material compresses the gravel unevenly and creates a soft spot that shifts when water moves through the base.
After you finish the full first course, run your level along the entire row from end to end to catch any blocks that crept slightly out of plane during setting. Correct those now, because once the second course locks into place over them, your ability to make corrections drops significantly.
Add drainage, backfill, and reinforcement
With your base course level and locked in, the next phase of your build determines how the wall performs once Florida’s rainy season hits. Drainage and backfill work together to prevent hydrostatic pressure from building up behind the wall, and skipping or rushing this stage is the primary reason retaining walls built with Lowe’s retaining wall blocks fail within a few years of installation. Do this part right and your wall handles heavy rain without shifting.
Install the perforated pipe and gravel layer
Start by placing your 4-inch perforated drain pipe directly against the back face of your first course, holes facing down. The pipe needs a slight slope of at least 1 inch per 8 feet of run so water moves toward an outlet rather than pooling at the base. Once the pipe is positioned, lay landscape fabric over the native soil behind your trench wall before you add any gravel. This fabric stops the sandy Florida soil from migrating into your drainage stone and clogging the system over time.
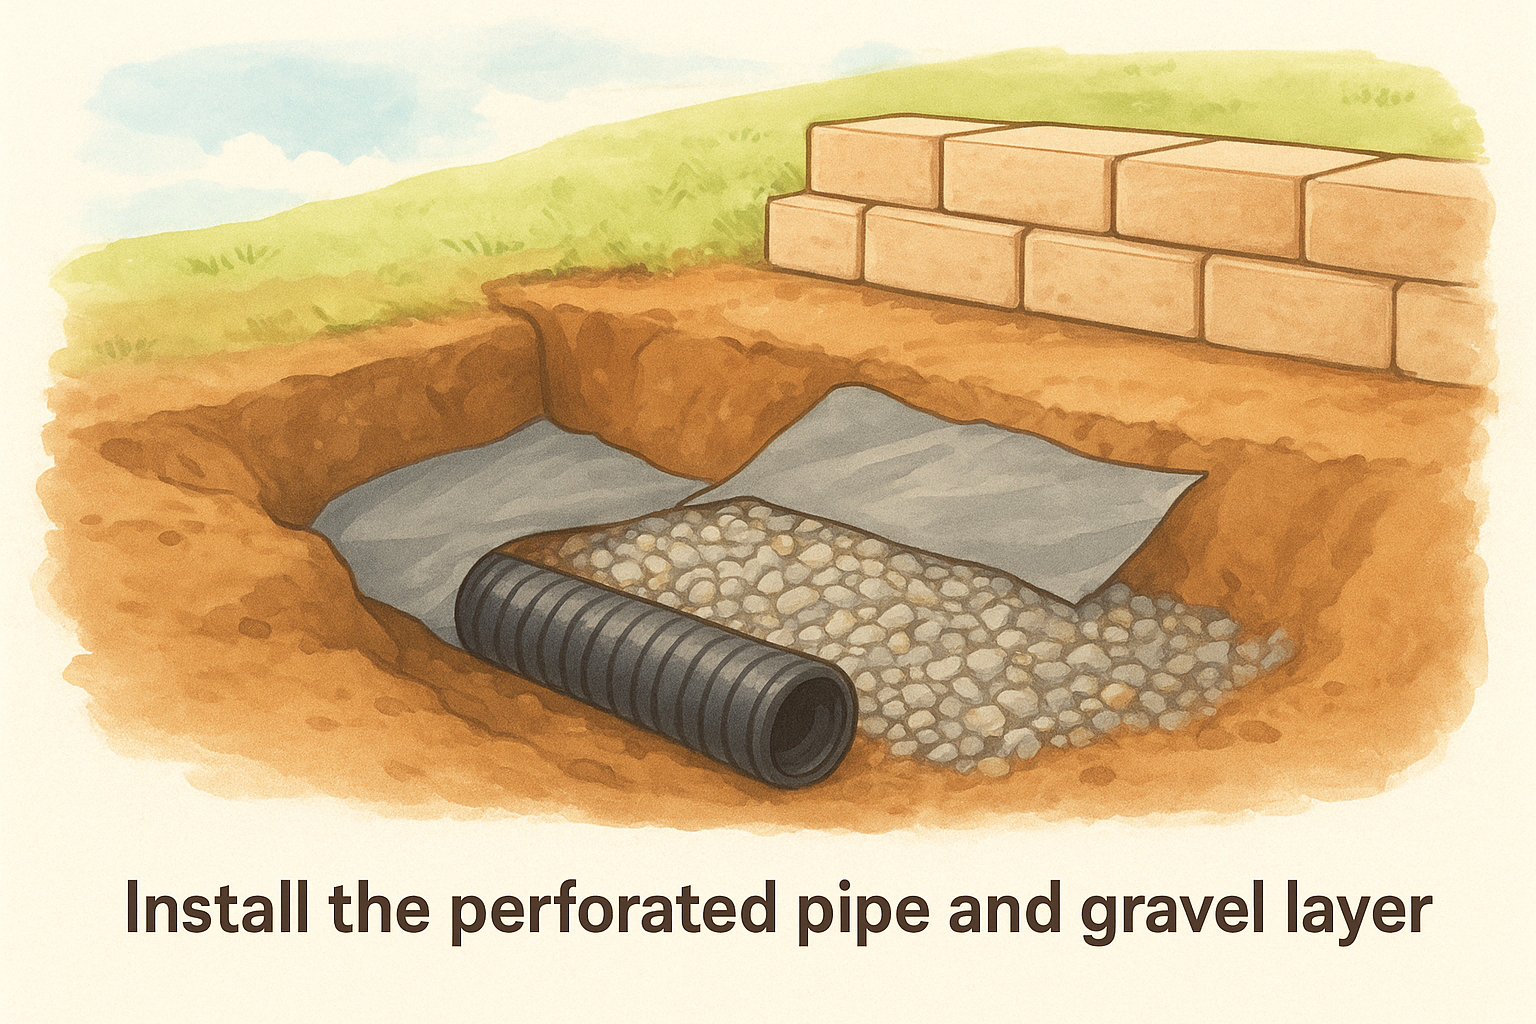
Landscape fabric goes between the soil and the gravel, not between the gravel and the blocks. Placing it wrong reduces drainage and traps water directly behind your wall.
With the fabric down, pour in washed crushed stone (57 or 89 grade) in 6-inch lifts and tamp each layer before adding the next. Your gravel column should extend at least 12 inches back from the wall face and rise the full height of your build.
Backfill and compact behind the gravel
Once your drainage stone column is in place, you can begin adding native backfill soil behind the gravel layer to fill the remaining gap between the drainage zone and the undisturbed slope. Work in lifts no deeper than 6 inches and compact each lift with a plate compactor or hand tamper before adding more material. Running your compactor too close to the back of the wall can push the courses outward, so stay at least 2 feet away from the wall face when you compact.
Check each course for level and forward lean as you build up and add backfill. Sandy soil in Fort Myers and Cape Coral settles more than compacted fill in other regions, so expect to add a small amount of additional soil after the first heavy rain and tamp it down again before finishing the upper courses and caps.
Finish with caps, steps, and cleanup
Your wall’s structural work is done once the final course is level and backfill is compacted, but the finishing layer determines how the wall looks and how well it holds up against foot traffic, UV exposure, and weathering over time. Caps, steps, and a thorough site cleanup are the details that separate a wall that looks professionally built from one that reads as a rushed DIY job.
Set and bond your cap blocks
Cap blocks go on top of your final course and lock the wall’s top edge in place. Apply a bead of manufacturer-matched block adhesive along the top of your last structural course before you place each cap. Press each cap down firmly with both hands, check it for level, and wipe off any adhesive squeeze-out immediately before it cures. Most Lowe’s retaining wall blocks product lines sell matching caps, and using the matched cap keeps the color and texture consistent across the finished face.
Allow the adhesive to cure for at least 24 hours before you let foot traffic or heavy equipment near the wall edge.
Work from one end to the other without lifting and repositioning caps mid-run. Re-setting a cap after the adhesive has started to grab weakens the bond and creates a gap at the joint that water can work into during Florida’s rainy season.
Add steps if your design includes them
Steps tied into a retaining wall require full-depth block courses stepping down into the slope, not blocks stacked on top of the finished grade. Each step tread needs to sit on a compacted gravel base the same way your wall’s base course does. Use your level to confirm each tread is flat and slightly pitched forward, about a quarter inch, so rainwater runs off the front edge rather than pooling on the surface.
For a standard step configuration, each riser should measure 6 to 8 inches tall, which matches most Lowe’s wall block heights without cutting. Adhesive every tread to the riser below it the same way you bonded your caps.
Clean the site before you call the project done
Sweep loose gravel and block chips off the wall face and surrounding area once your adhesive has fully cured. Rinse the block face with clean water to remove any dust or adhesive residue that clouded the texture during installation. Rake your finish grade away from the back of the wall so surface runoff moves away from your drainage zone, and reseed or sod any bare soil within 48 hours to stop erosion before the next rain hits.
Avoid common retaining wall failures
Most retaining wall failures don’t happen because someone chose bad blocks. They happen because a critical step was skipped during installation and the problem stayed hidden until the wall was fully built. Understanding where DIY walls typically break down lets you catch those errors before they cost you a rebuild.
Neglecting drainage behind the wall
The leading cause of retaining wall failure across Southwest Florida is inadequate drainage. Hydrostatic pressure builds up fast behind a wall when water has nowhere to go, and sandy soil saturates quickly after heavy rain without a proper drainage system behind the blocks. If you used Lowe’s retaining wall blocks but skipped the perforated pipe or ran less than 12 inches of crushed stone behind the wall, that wall is under pressure every time it rains hard.
A wall that looks solid after construction can develop a forward lean within a single rainy season if the drainage layer behind it is undersized or missing entirely.
The fix during the build is straightforward: run a full column of washed crushed stone from base to cap and slope your perforated pipe toward a real outlet. After the build, watch for pooling water directly behind the wall after storms, which signals that your drainage outlet is blocked or undersized.
Setting blocks on unstable base material
Blocks set on loose soil or an uneven gravel base shift as the ground below them moves. Florida’s sandy soil compresses unevenly under saturated conditions, which means a base that felt firm during dry construction may settle after the first significant rainfall. The blocks above that base course follow, and the entire wall steps out of alignment.
Prevent this by tamping your gravel base in 2-inch lifts rather than dumping it all in at once and setting blocks directly over it. If you notice a section of your base course has dropped even a quarter inch after the first rain, pull those blocks, add gravel, re-tamp, and reset before you add any more courses.
Compacting backfill too close to the wall face
Running a plate compactor within 2 feet of your wall pushes the courses outward, and that outward lean is permanent once the adhesive on your cap blocks cures. Use a hand tamper for any backfill within 2 feet of the block face and reserve the plate compactor for the area further back into the slope. This one habit prevents the forward bulge that makes otherwise solid walls look and perform poorly within the first year.
Next steps for a wall that lasts
Building a retaining wall with Lowe’s retaining wall blocks is a manageable project when you follow each phase in order and don’t skip the drainage work that Southwest Florida’s soil and rain seasons demand. The blocks themselves are only as reliable as the base, backfill, and drainage system you build around them, so treat every step in this guide as load-bearing, not optional.
If your wall is taller than four feet, sits on a steep grade, or needs to hold back significant soil load near a structure, get a professional assessment before you pour a single bag of gravel. Some projects cross the line where DIY execution creates real structural and safety risk, and that line is worth knowing before you start. For Southwest Florida homeowners who want expert installation from the ground up, contact the team at CHC Concrete for a free on-site estimate.